
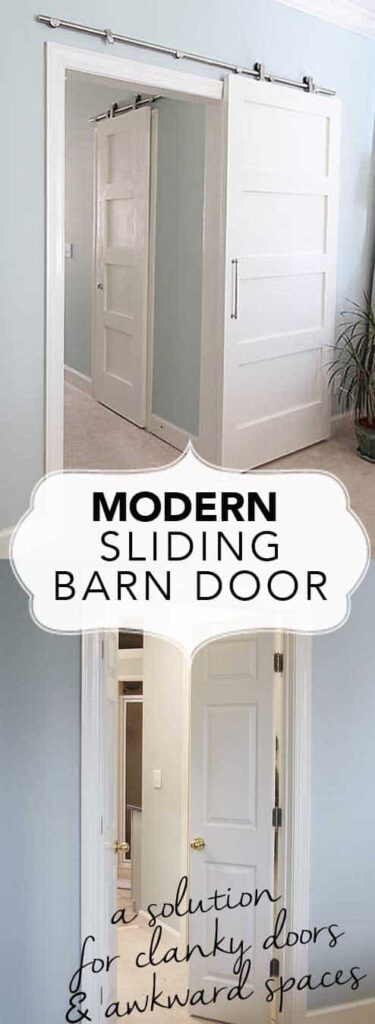
In my last post, I revealed our Modern Barn Door: An easy solution for awkward entries. In this post I am going to show you how to build a barn door for $50!! To say that this makeover has changed the way we function in our master ensuite is an understatement.
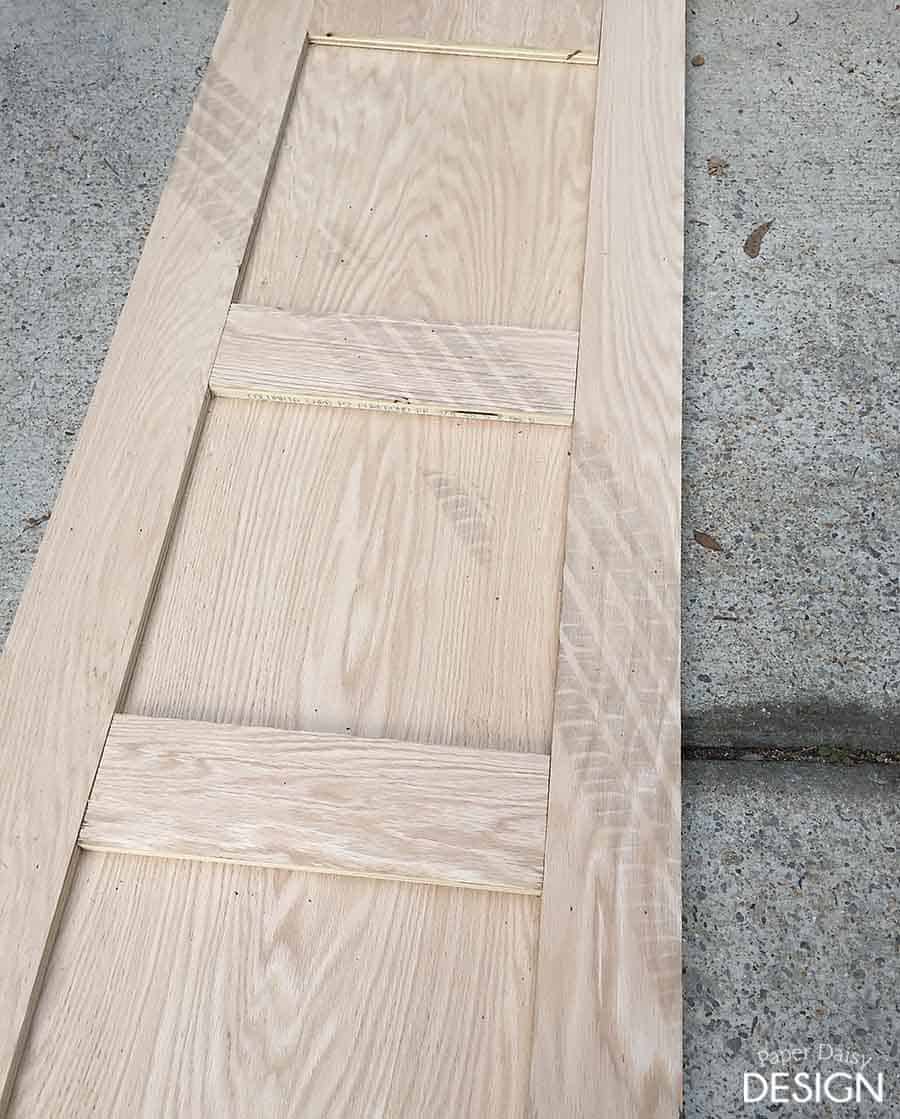
I’m back today for the complete details on how we built ALL THREE , contemporary styled, 4-panel doors for around $150. Yes, for the average price of one door, we built three! A bit of FYI, the 4-panel door is most common in Canada and Europe. A similarly styled door in the states is typically 5-panel.
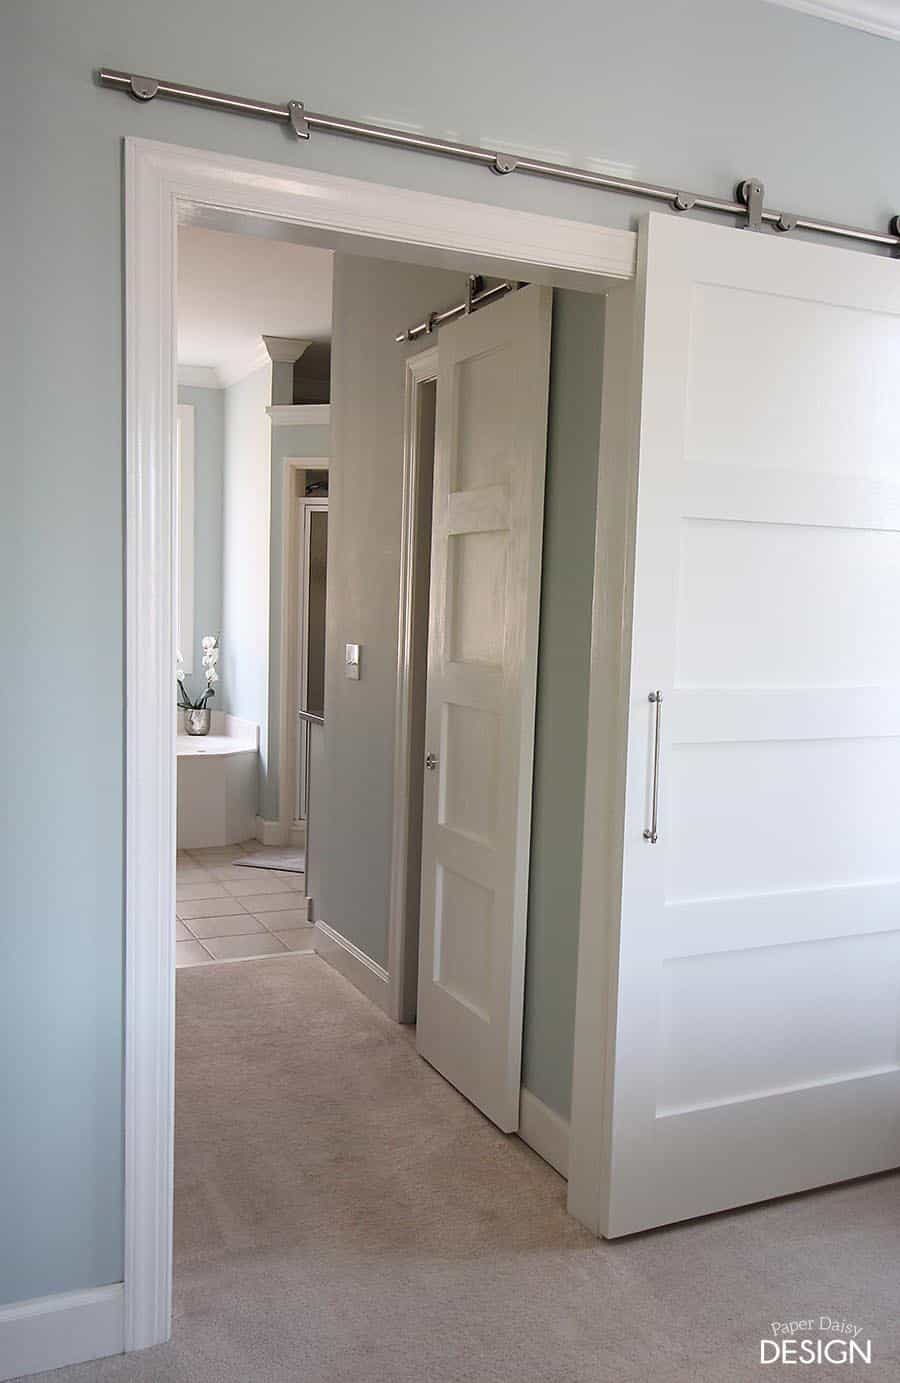
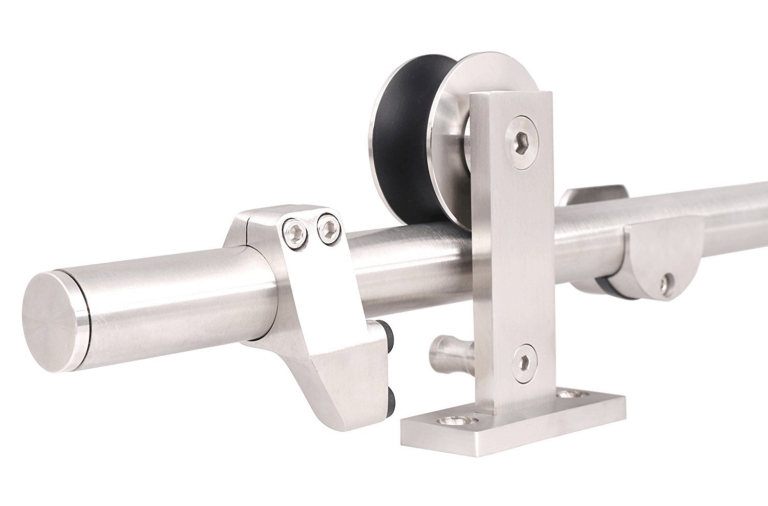
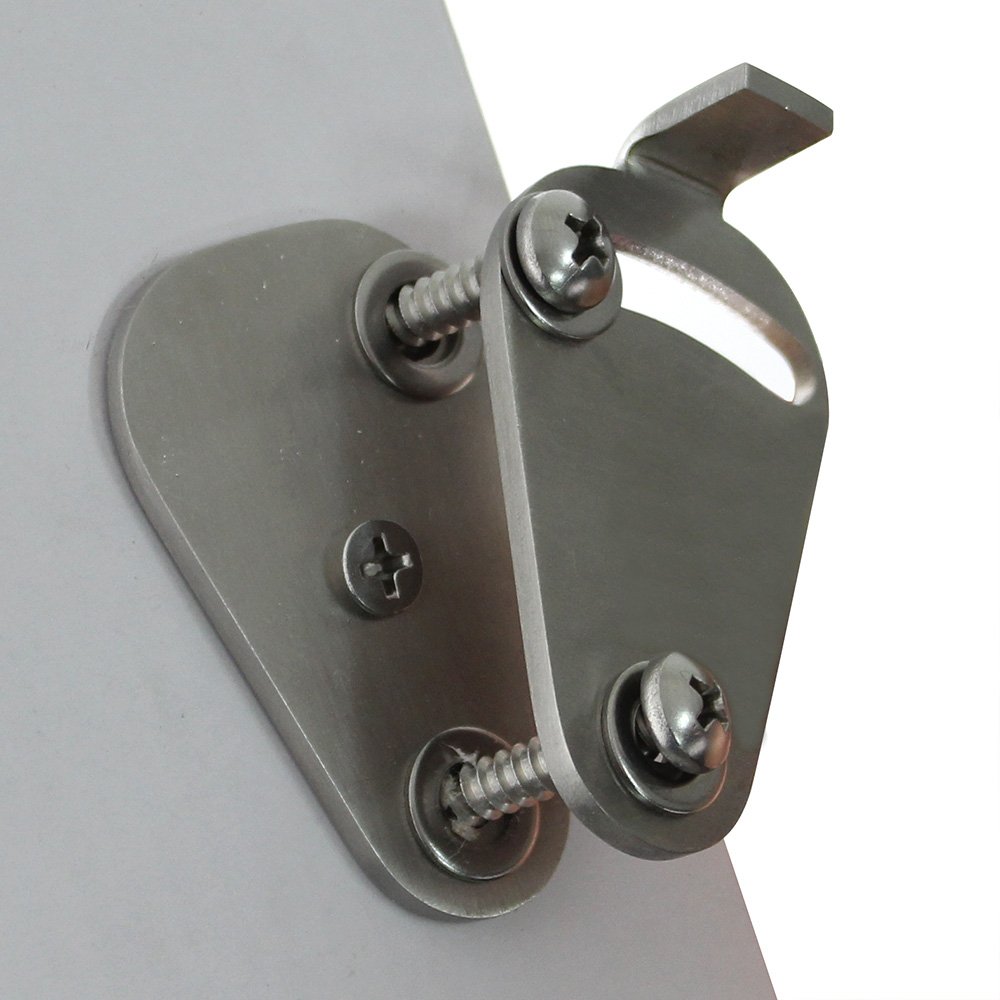
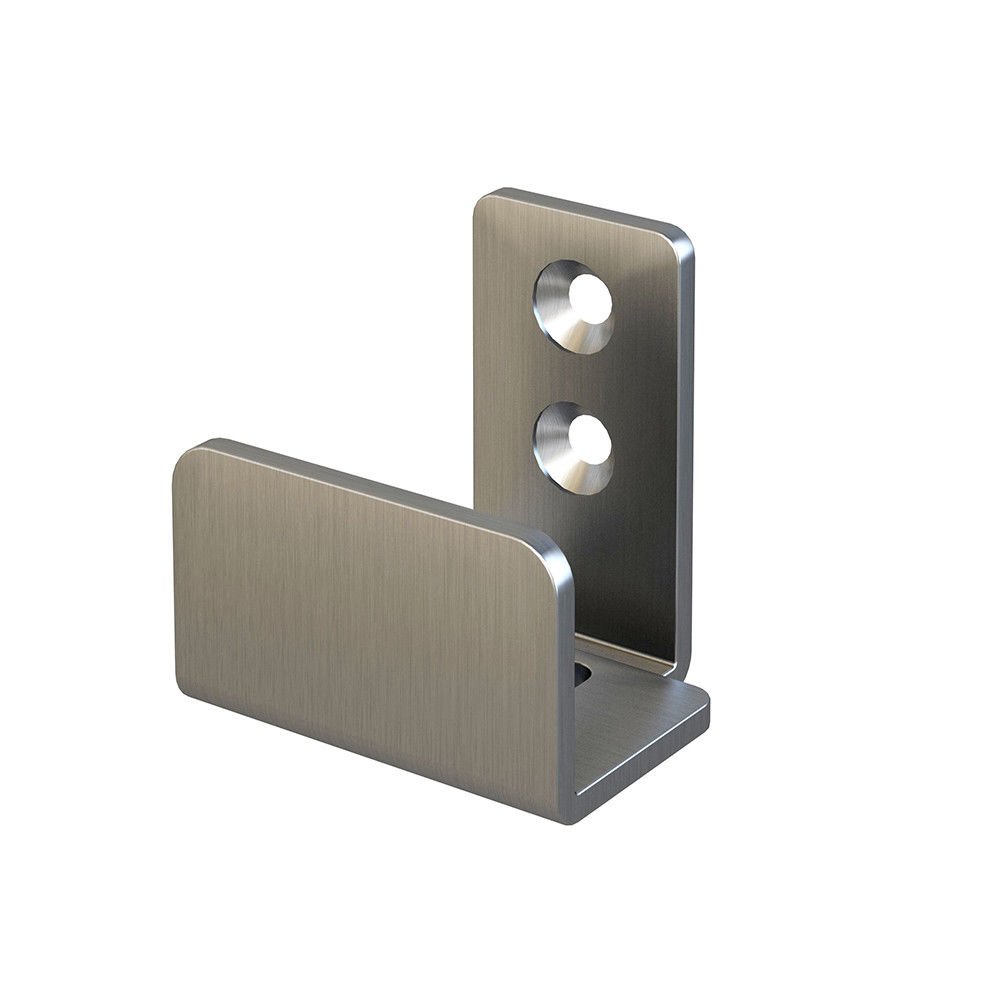
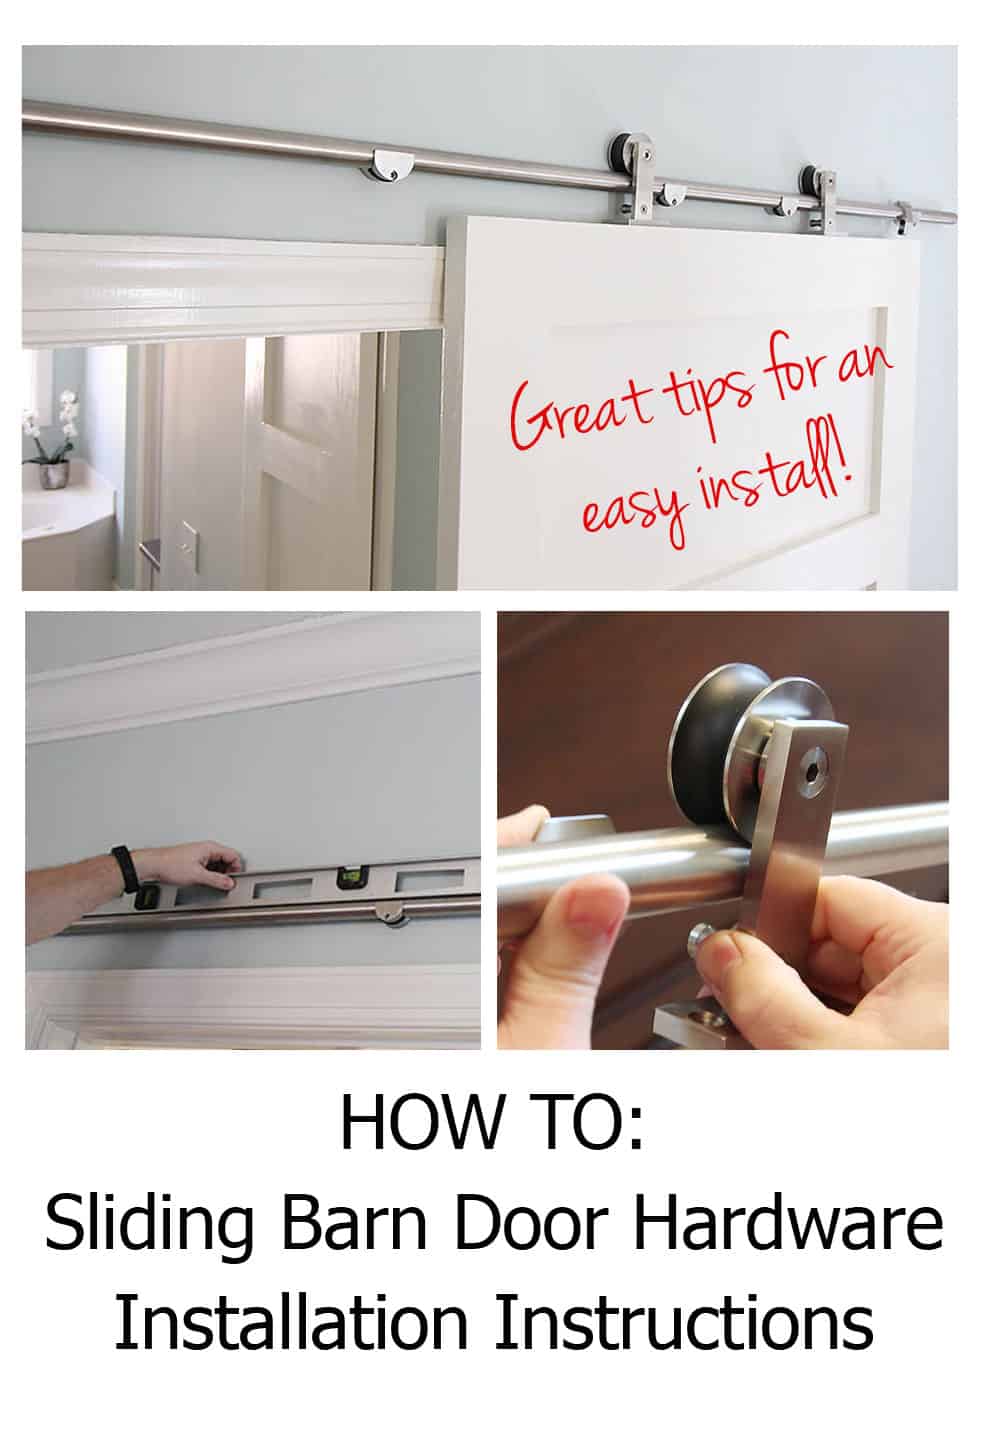
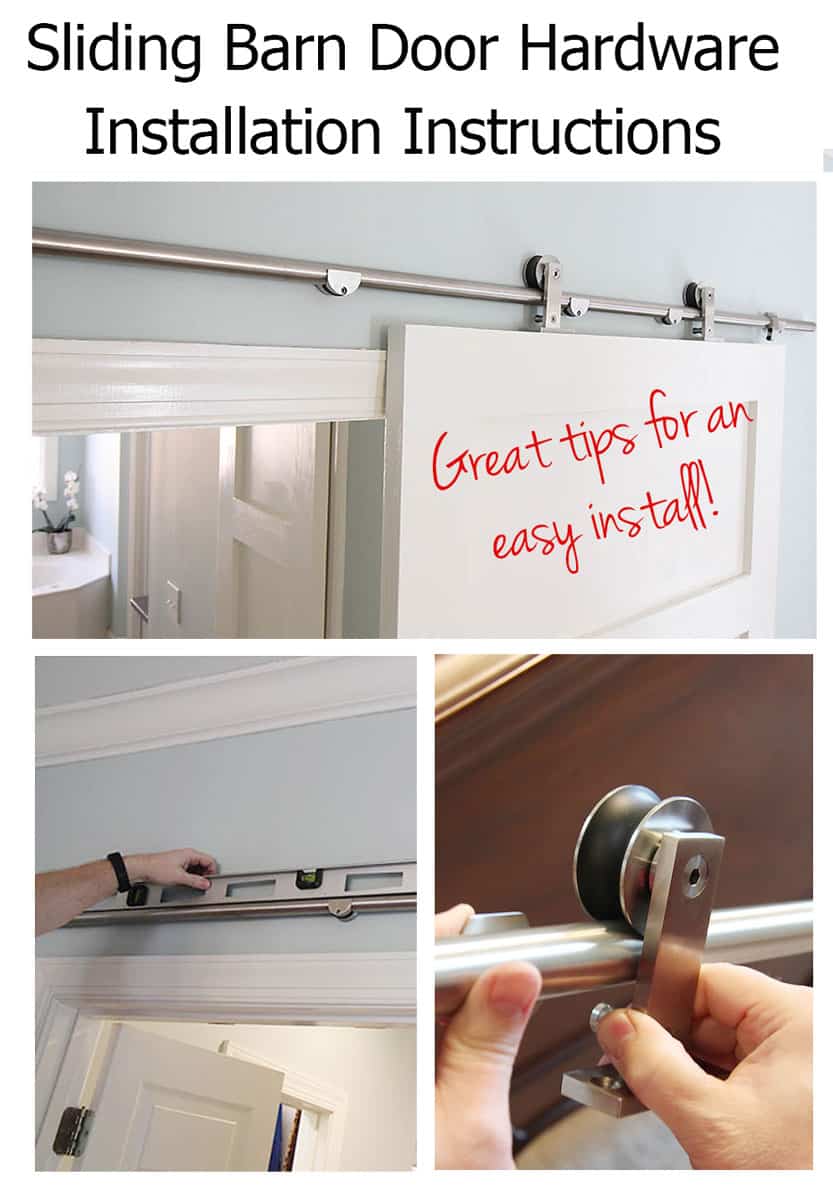
This is the modern barn door hardware we used. We love it!
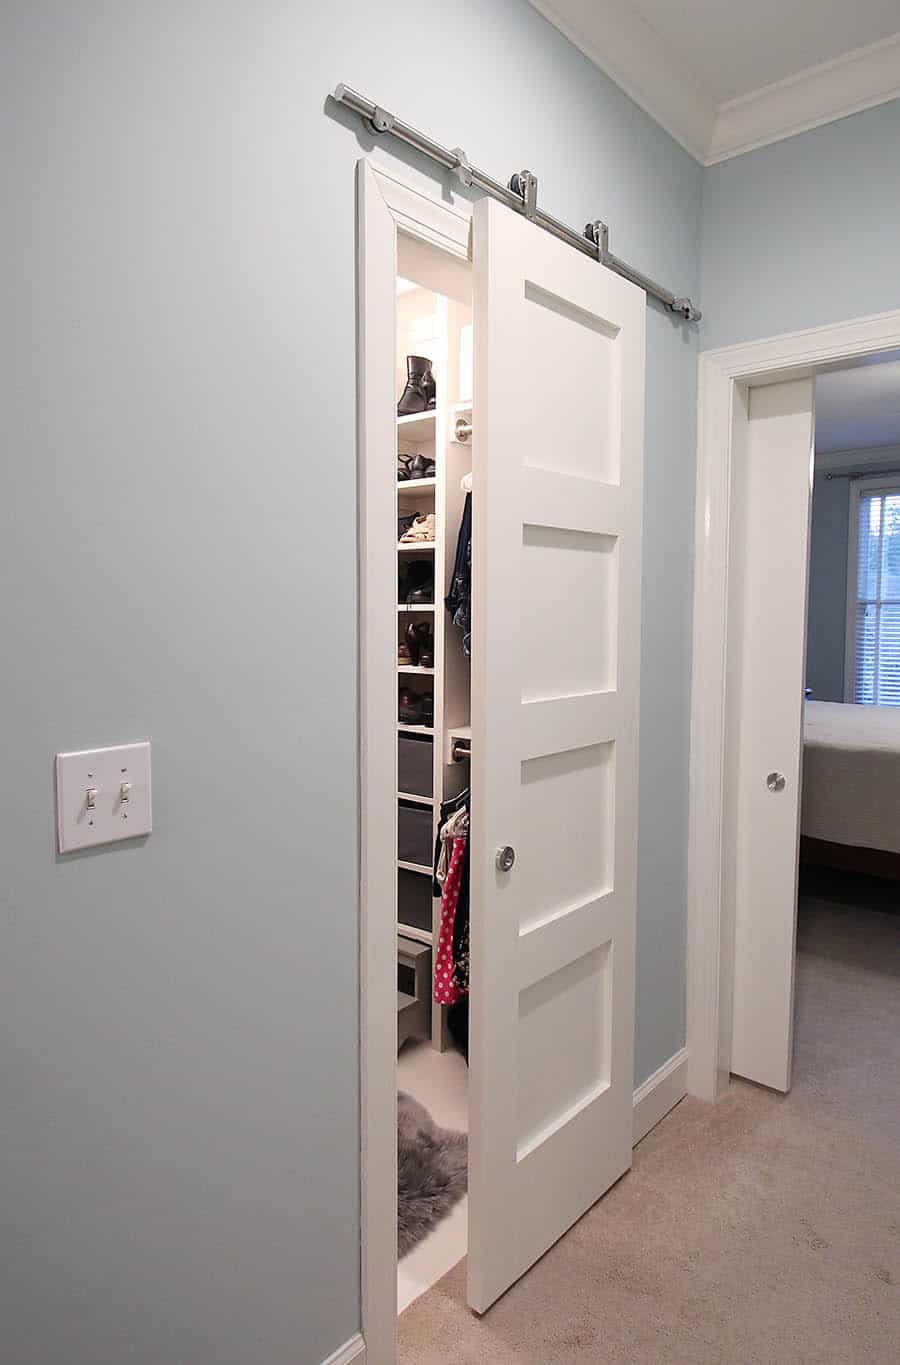
For some reason, going with the four-panel door really appealed to me. While the new doors don’t match the rest of our interior doors, I felt the style, with clean and uncluttered lines, complimented our shaker kitchen cabinets.
Because we have become quite the fans of Purebond Plywood in Red Oak, we knew we would be building the doors ourselves with their product. It’s an environmentally safe, hardwood product. And when I say hardwood, I mean it. Just keep reading, you’ll see!
We don’t own a truck, so we had to figure out where to have Home Depot cut the sheets of plywood so that they would fit in our small SUV. Just for reference, we can fit a piece that’s around 40″ x 96″. We do this for just about every plywood project and then make the rest of the cuts at home. But if you don’t own a table saw, they generally do an okay job of ripping the pieces for you.
This post contains affiliate links for your convenience.
Here are few tools you will need for this build.
Barn Door Hardware4 ft Level
Digital 2 ft Level
Easy & Accurate Stud Finder
Cordless Drill
Drill Bit Set
Metric Self-lock Tape measure


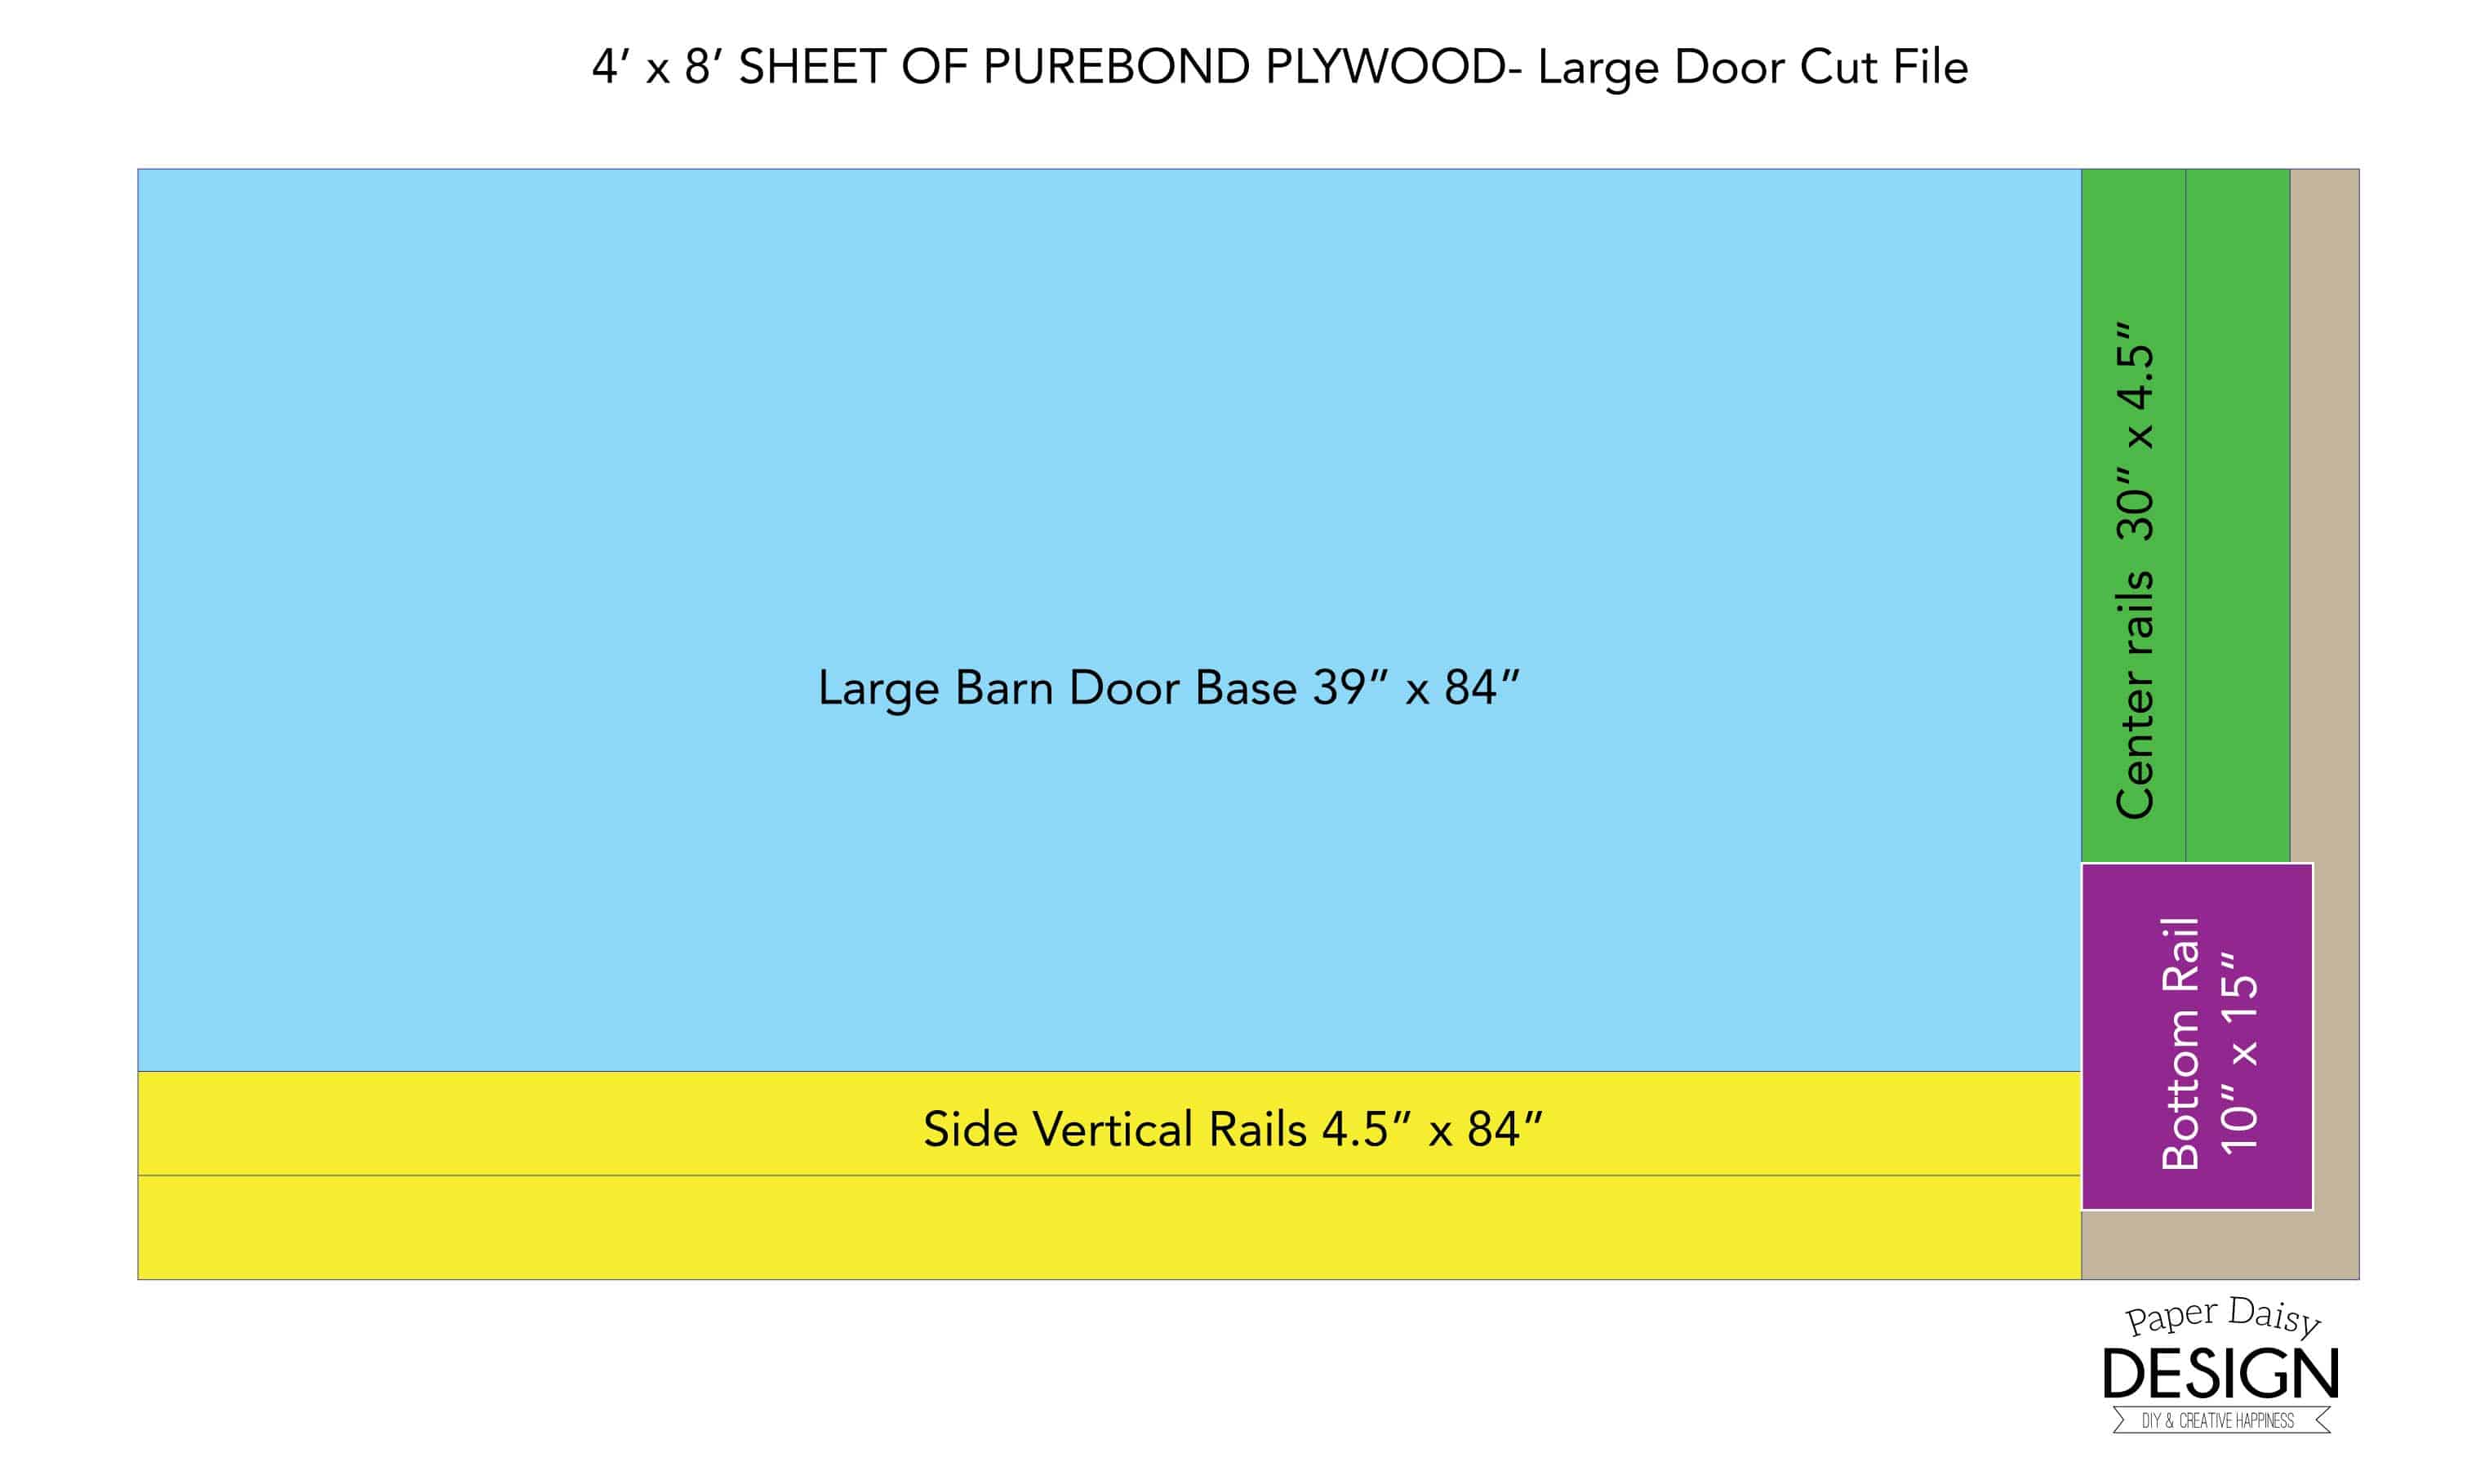
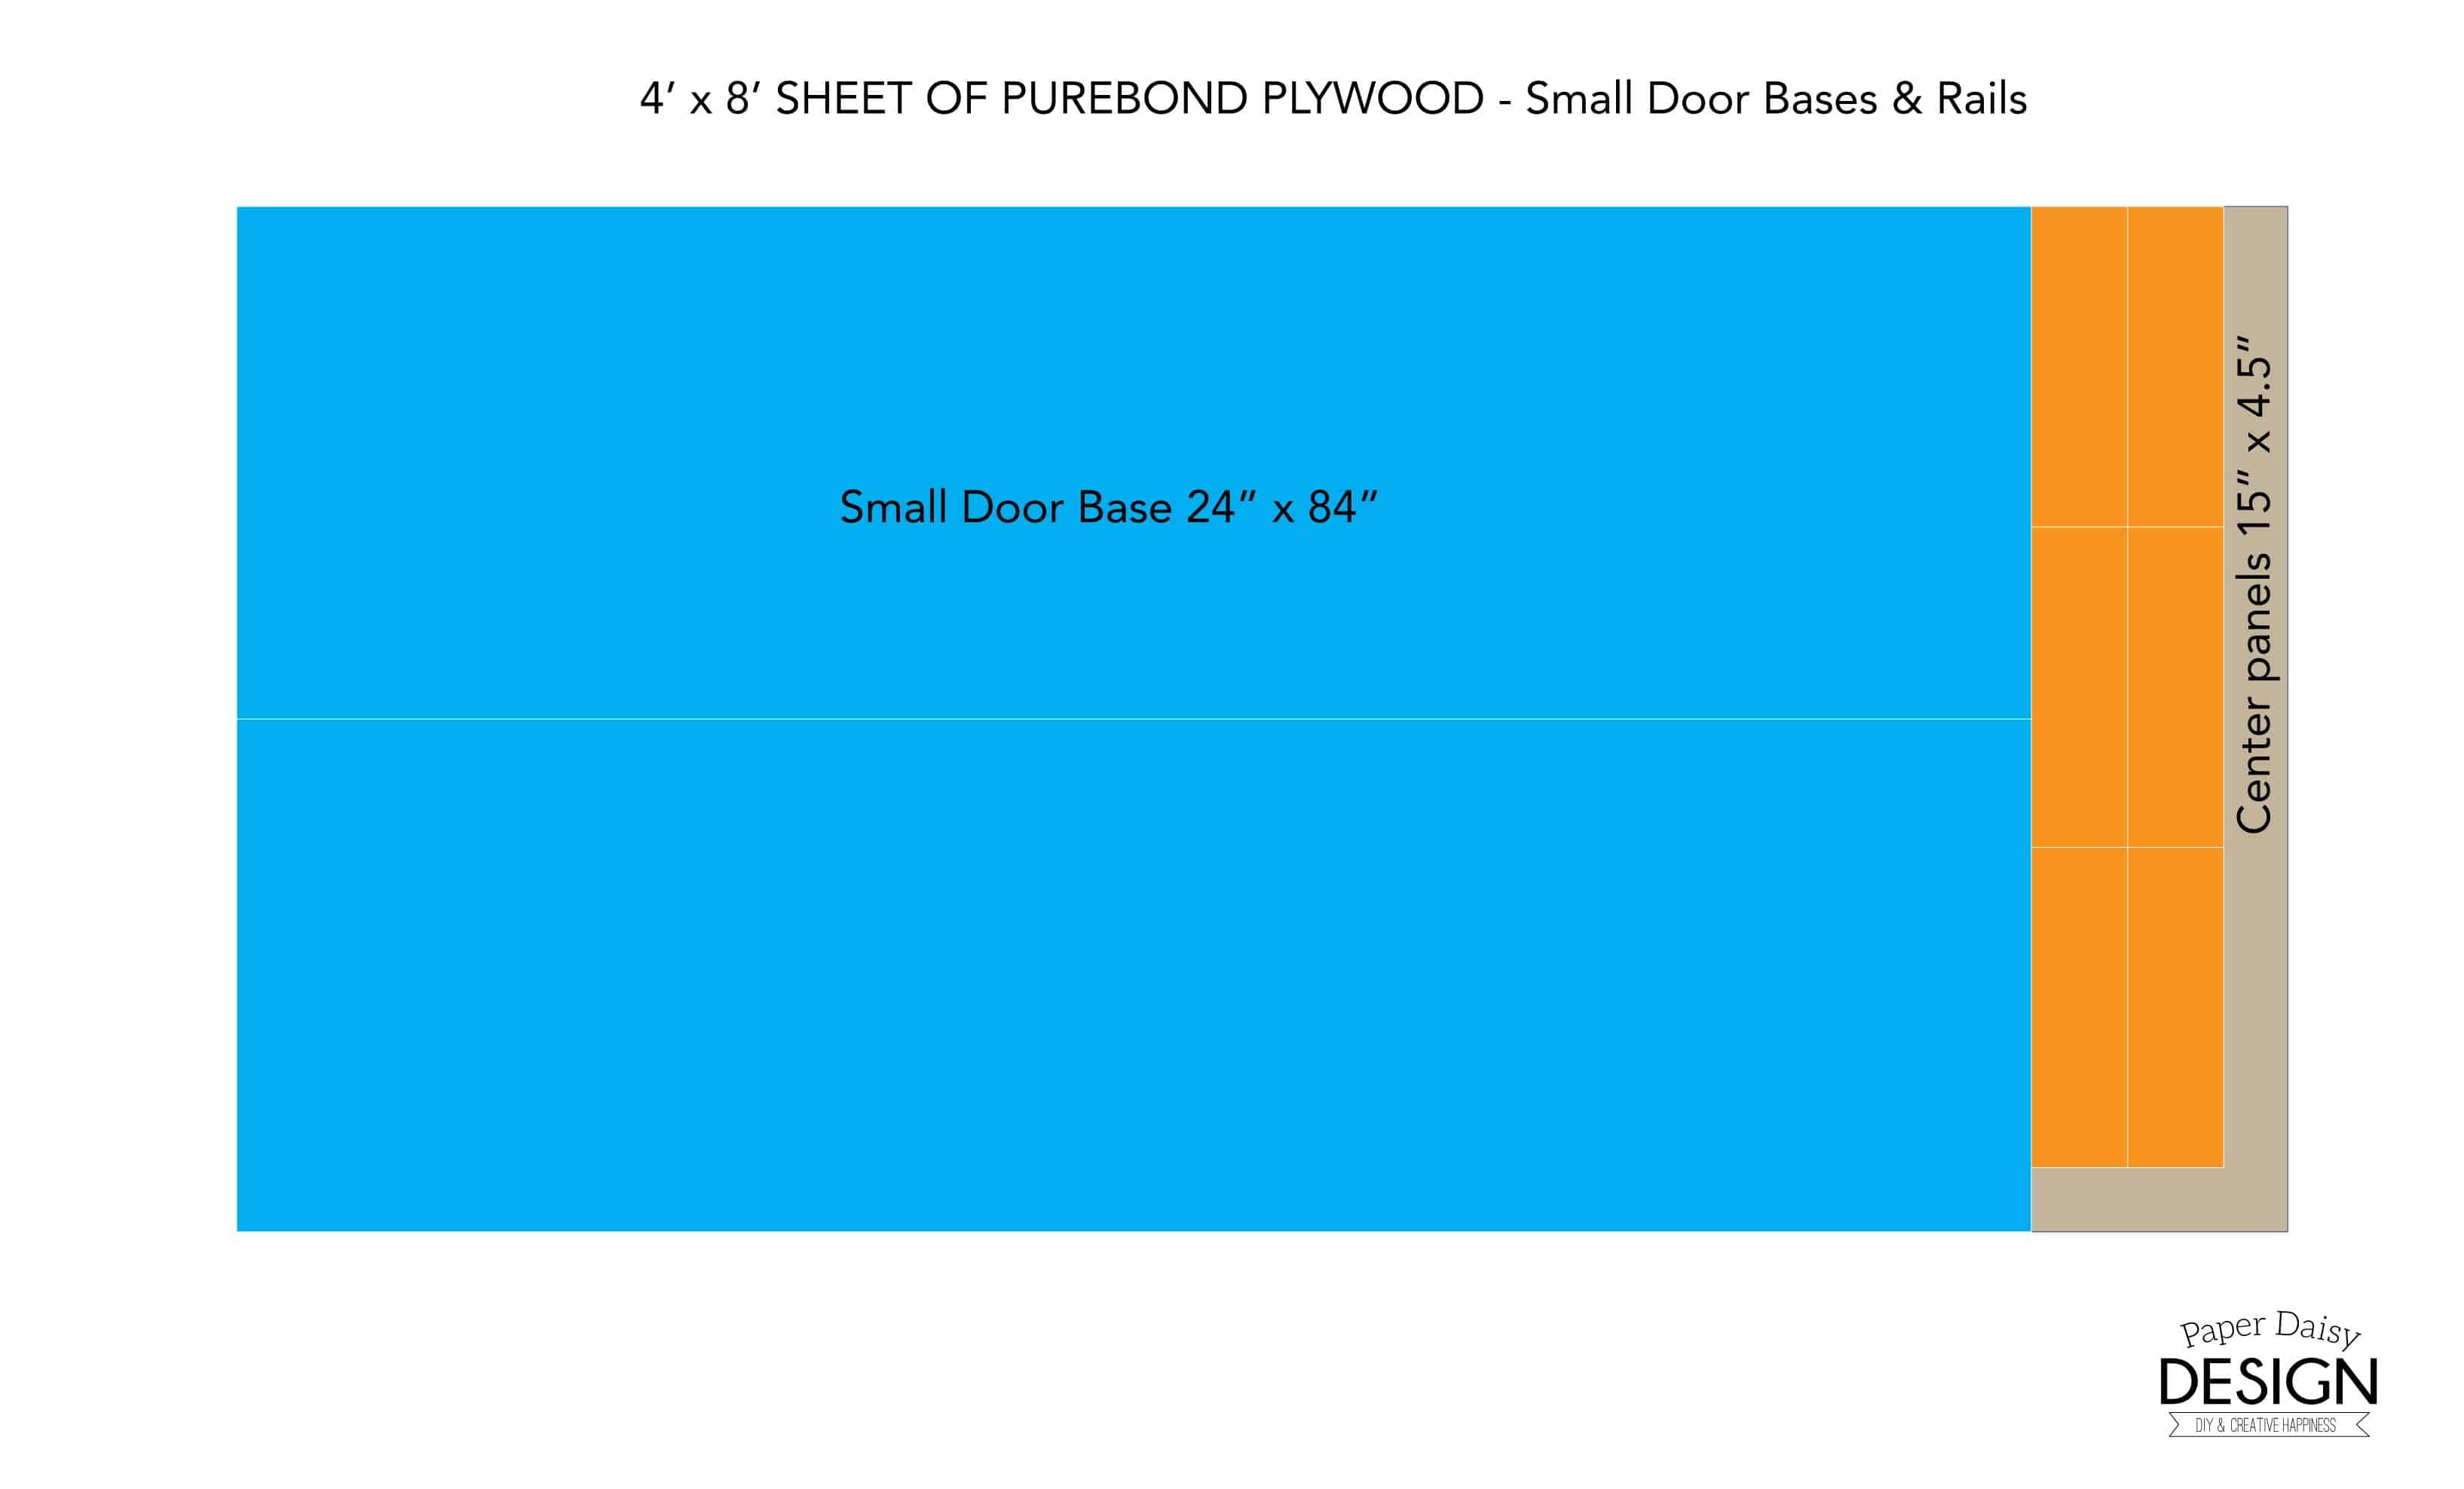
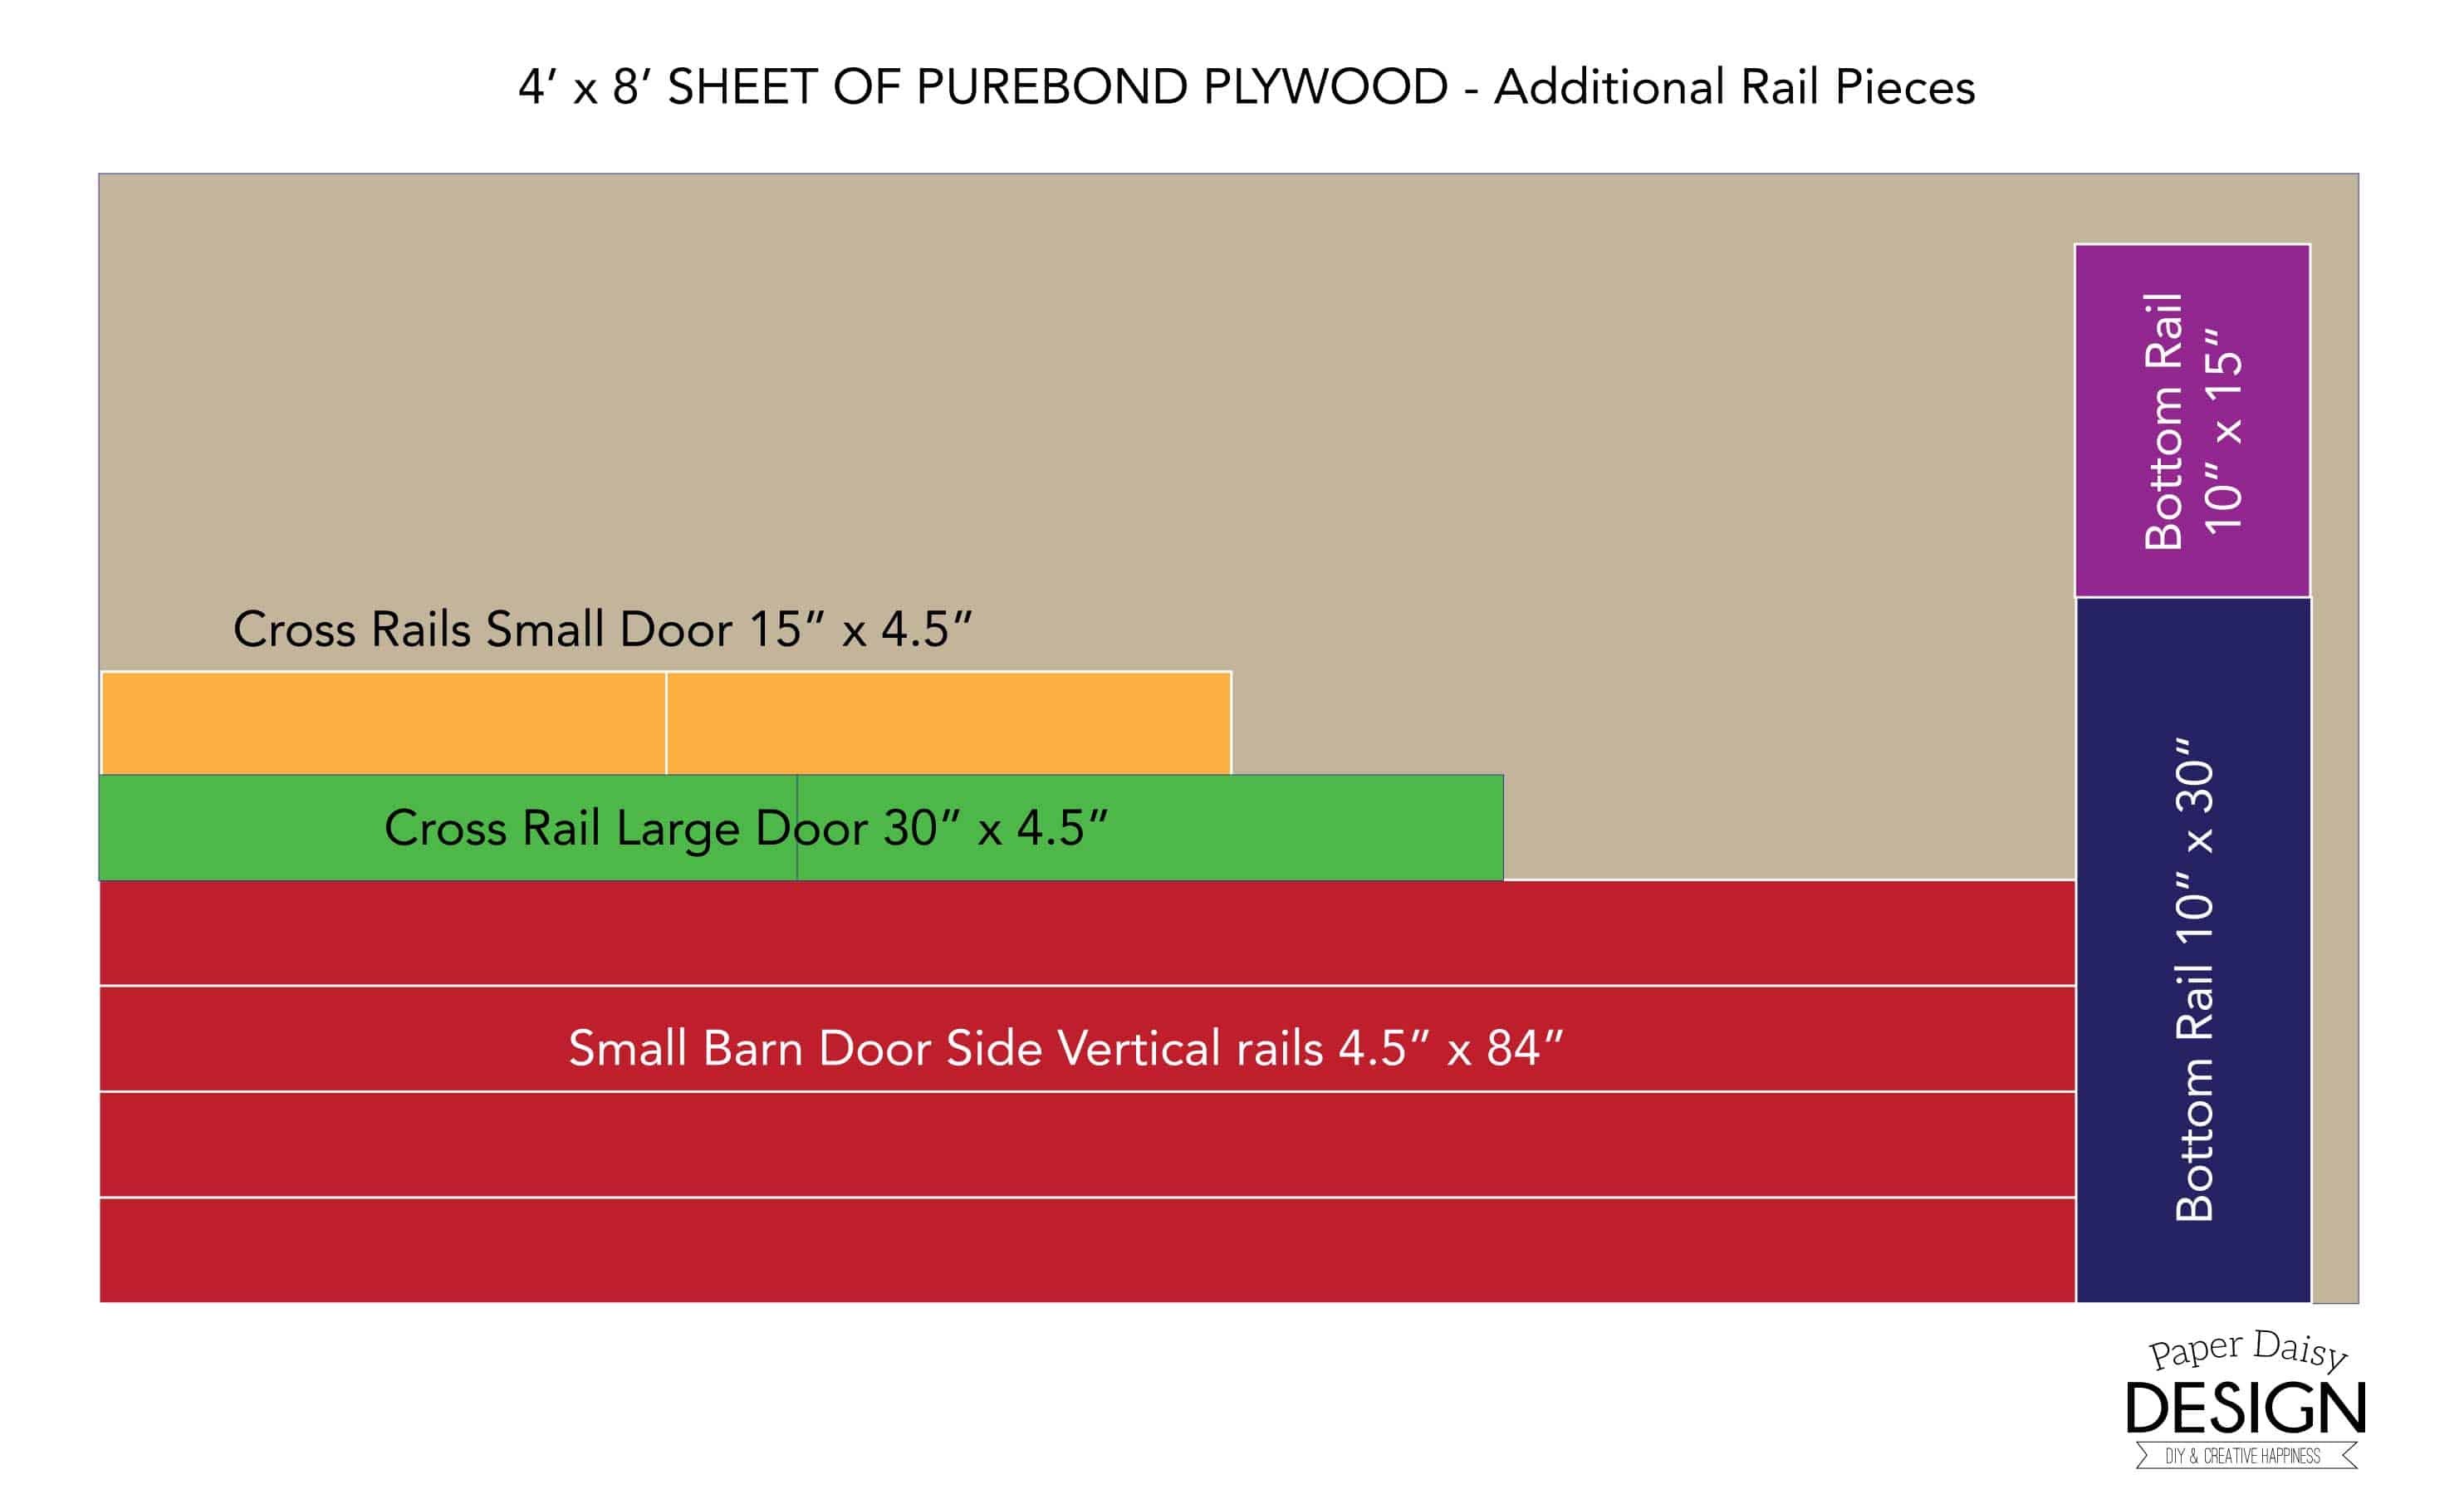
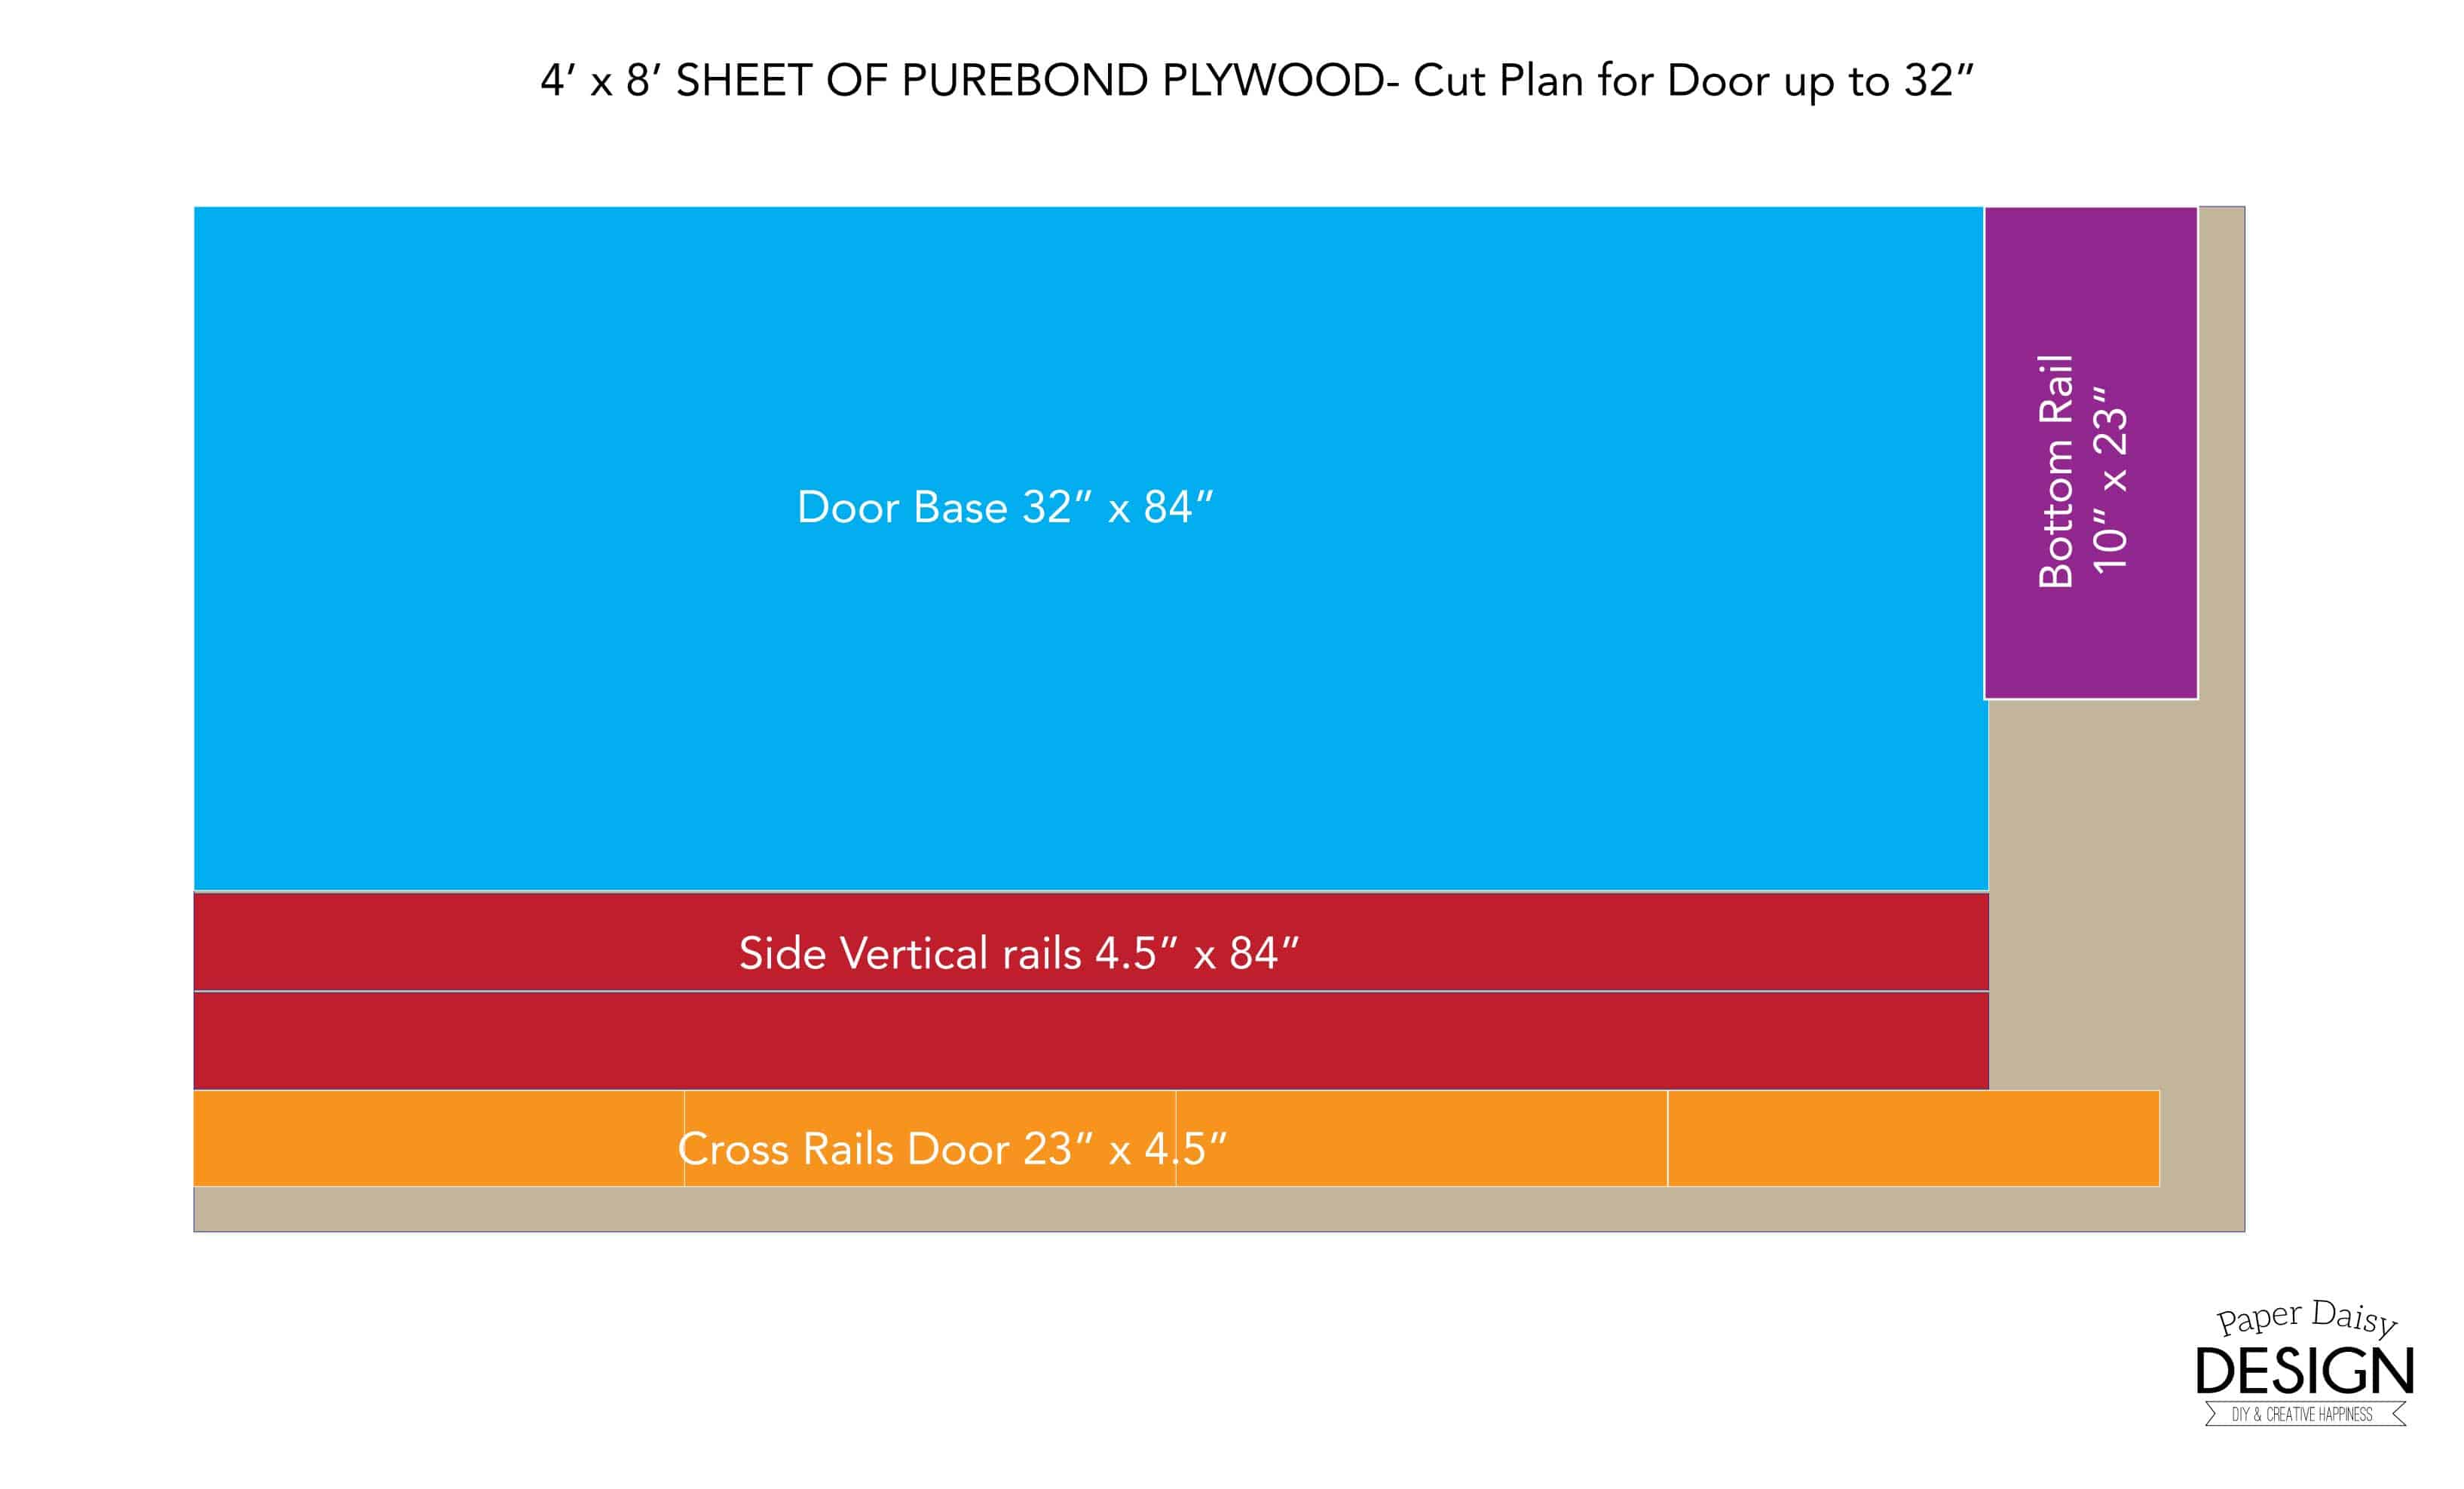
Use these diagrams for the most efficient use of your plywood
We used 3/4 inch Purebond Plywood for the construction of our doors.
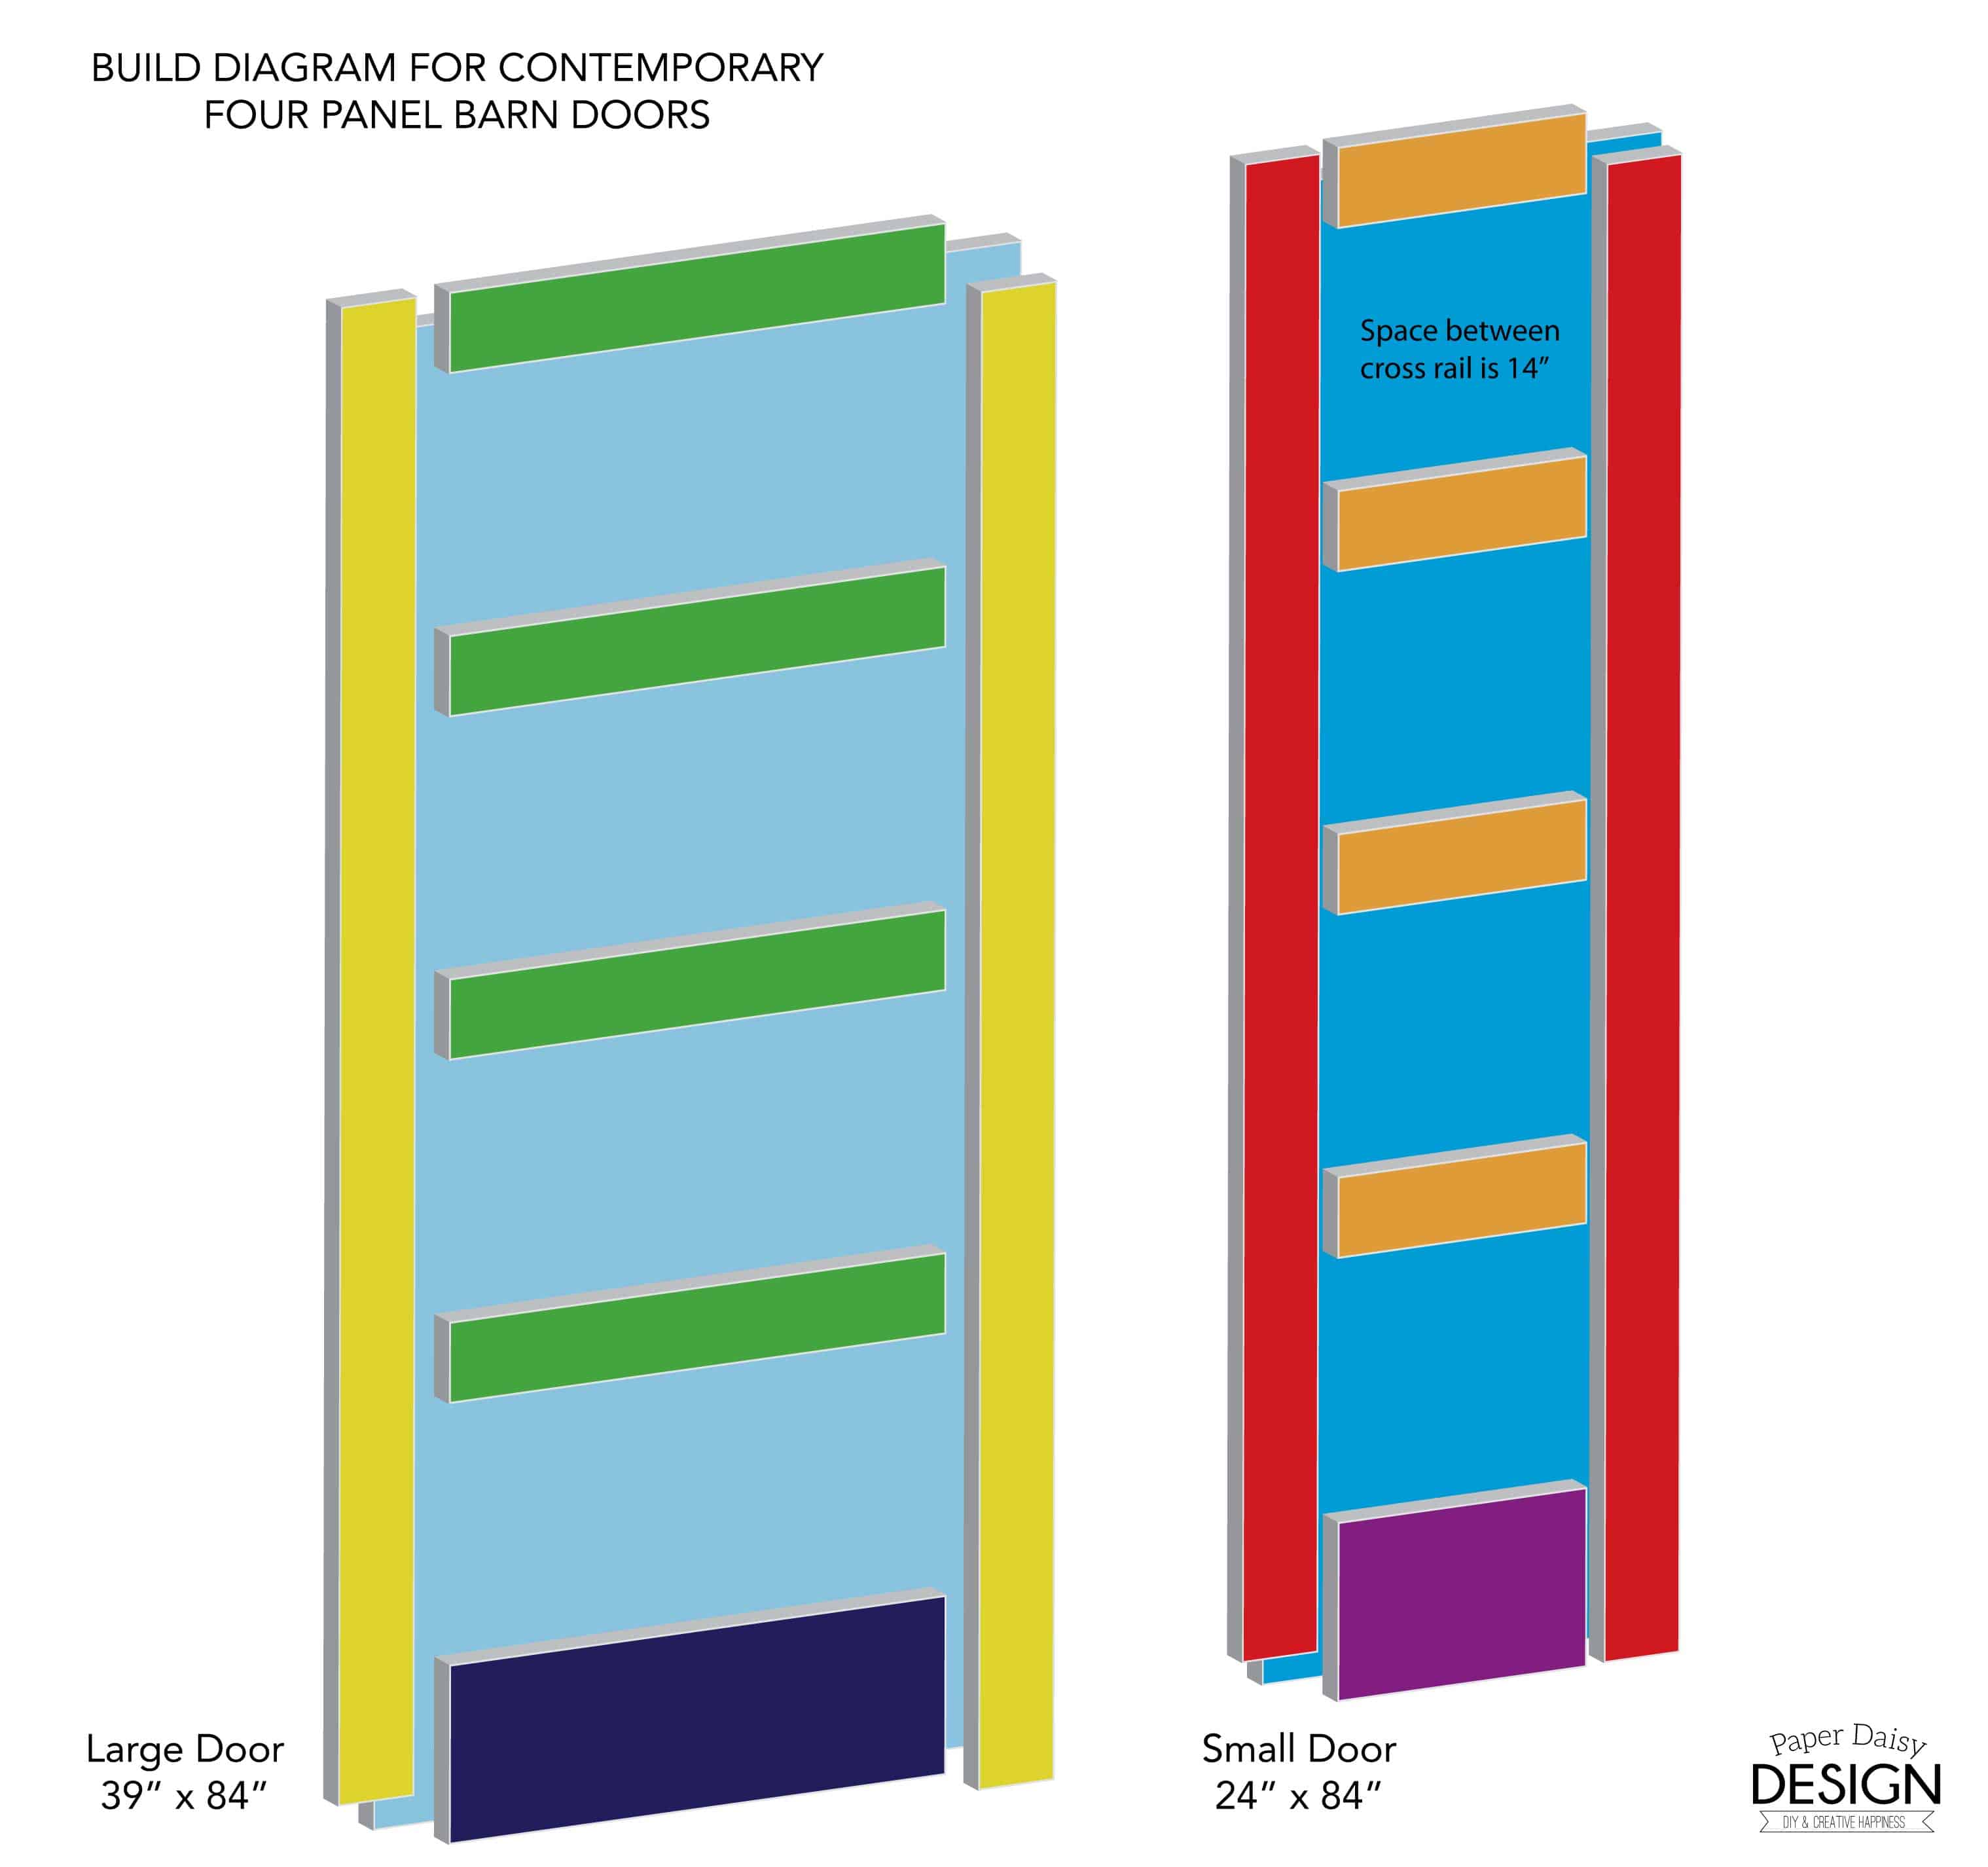
As you look at the cut file diagrams from the 3 sheets of 4 foot by 8 foot 3/4 inch plywood below, you’ll notice the color of the pieces correlate to the where they were placed on the doors. But in all actuality, I’ve included these just for reference. It’s likely that for your own project your door dimensions will be different and I would recommend sketching out your own plan.
In hindsight, we would have benefited from cutting each of the small doors from a separate piece of plywood. That would have given us a little more width for each door. But we chose to make our closet door the exact size of the opening, 24″, for two reasons. One, the space to the right of the door where it would rest when open is only 24″ and second, 98% of the time we don’t close our closet doors. So in essence, our closet doors are mostly aesthetic.
Because I want to provide you with as much information as possible, I’ve sketched up an imaginary door that is 32″ wide. You’ll note that our large door, 39″ x 84″ will require more than one piece of plywood. As you can see, this demonstrates that one door under 32″ can be made with one sheet of plywood.
That’s right! A door up to 32″ can be built for around $50! Pretty cool, right?
How to Build Custom Barn Doors, with a modern or contemporary design
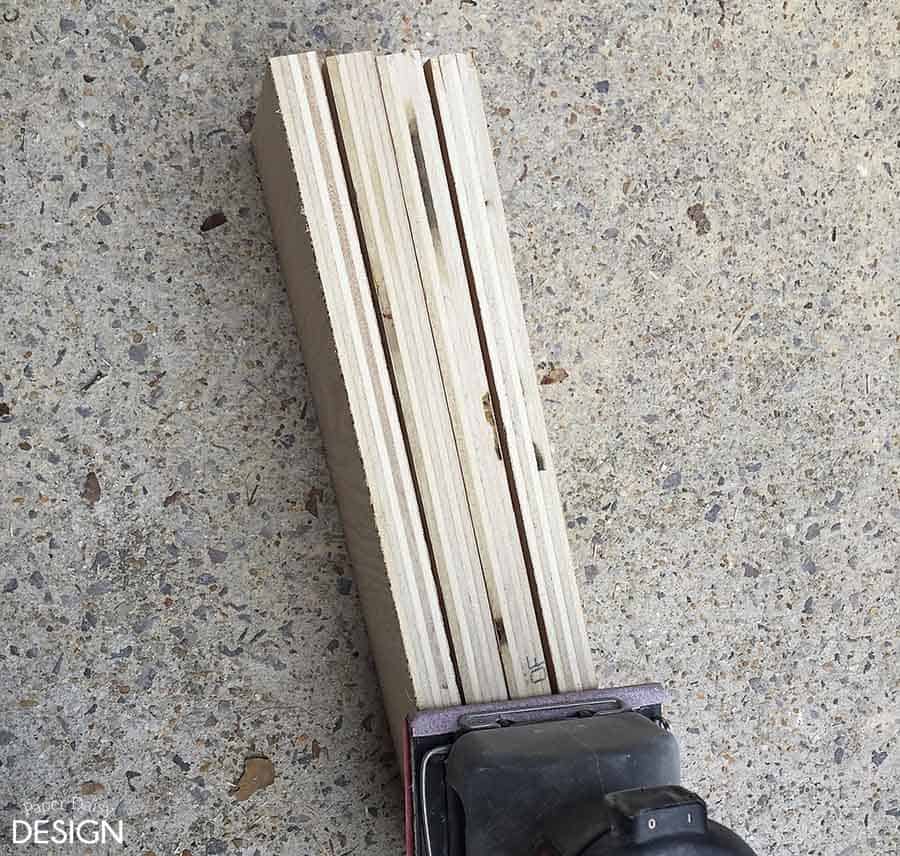
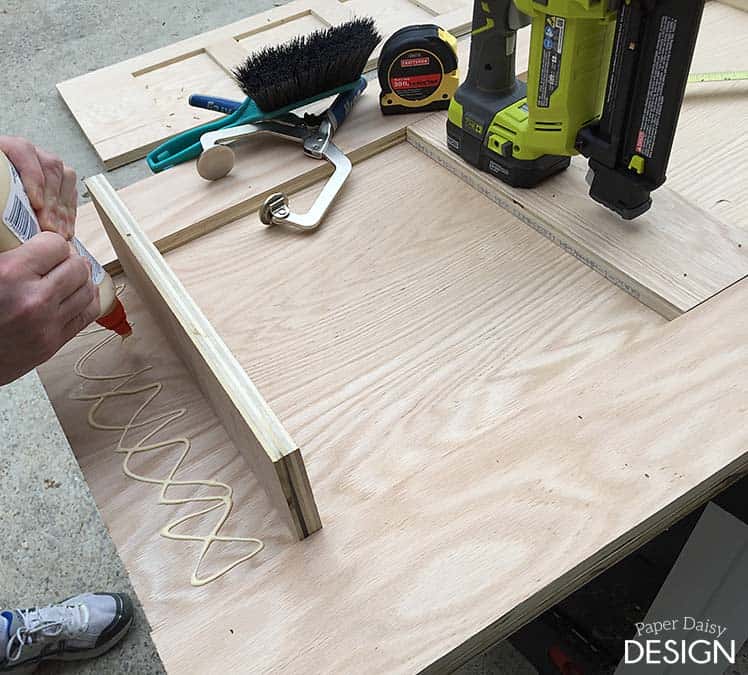
The actual build was super easy. But, after you do all of your cutting, I would recommend sanding the sides of the rails with a power sander. The cuts on plywood can be pretty rough and it’s harder to sand the edges once it’s all put together.
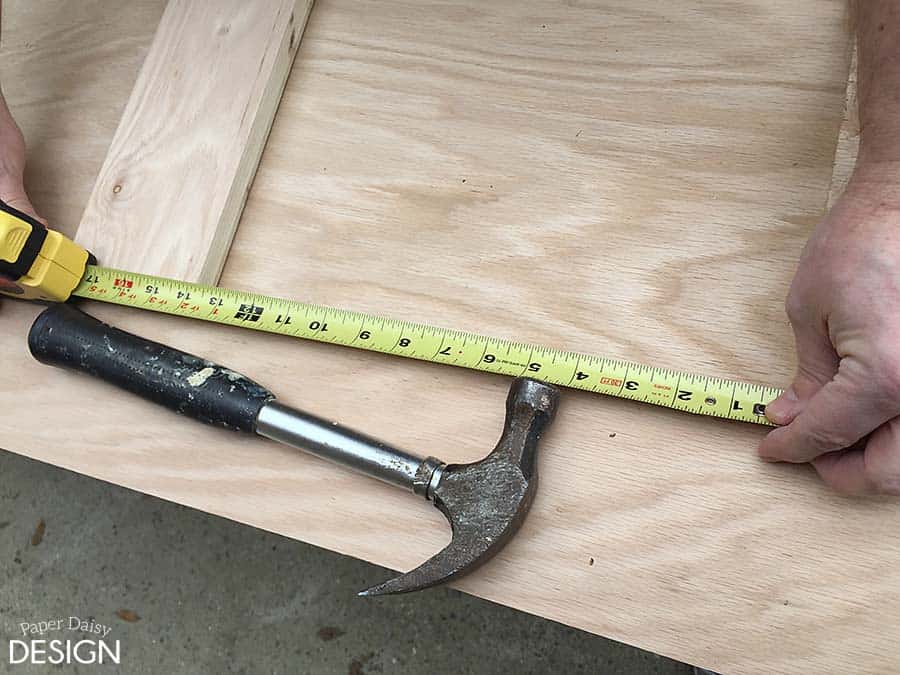
After you have your edges sanded, get them square on the door with vertical and horizontal rails in place.
Nail the vertical rails first and then measure out your desired space between the rails. We used 14″ for our spacing of a door that was 84″ high, and nailed those in place.
The 18 Gauge Ryobi Airstrike 18 Ga is the perfect tool to make quick work of the nailing. We used 1.25″ nails for nailing the 3/4 cut pieces to the 3/4 base.
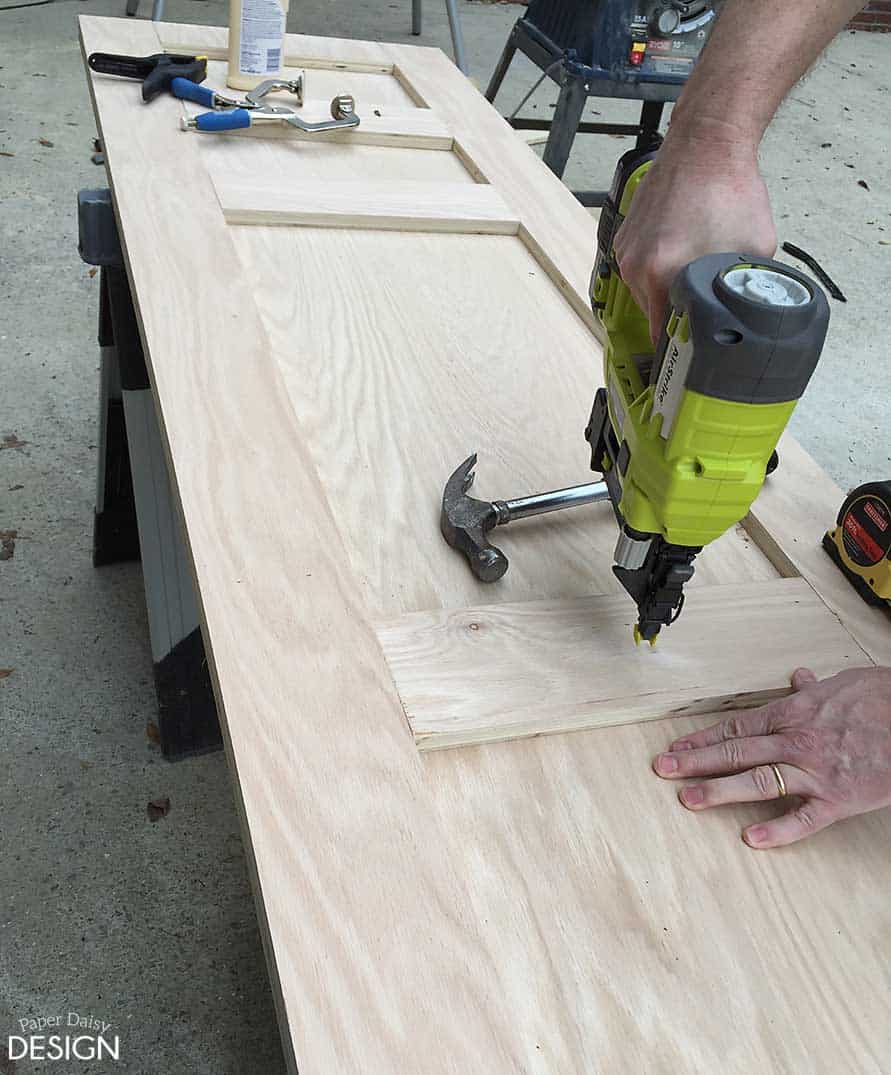
We added wood glue only to the top rails. This was the one place we wanted a little extra insurance, as our hardware was top mounting.
After the door is assembled, you’ll want to use wood filler to cover the nail holes and make smoother transitions between the rails. The goal is not necessarily to make the connections disappear, just smooth. The construction of the door is beautiful and simple. Embrace it.
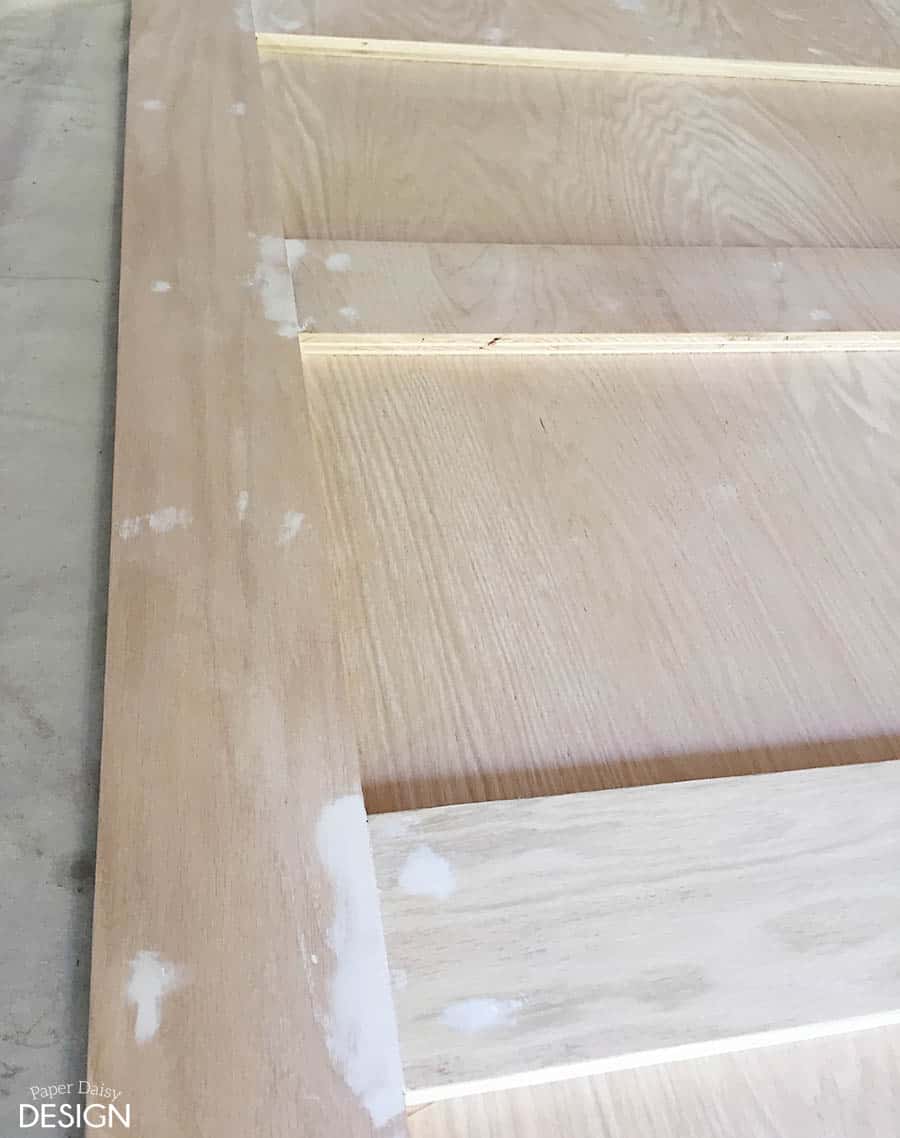
I found the side edge of each door needed a great deal of sanding and a bit of wood filler to get it nice and smooth.
To paint the doors, I spread them out on the garage floor. Each of the doors was painted with primer and one good coat of Sherwin Williams Pro-Classic Gloss Paint, in the same color as our trim. I used a 6″ fine nap roller and then followed with a sweeping of a 4″ brush, only lightly covered in paint. This smoothes out the roller bumps, so that your door doesn’t look like it’s been rolled.
Once they were hung and in place, there were some spots that needed caulk and touch up. Another coat of paint was applied to the sides of the rails.

Shop the post
Barn Door HardwareSliding Door Lock
Wall Mounted Door Guide
Bar Handle
Hook Style Lock
Now that your door is built, click this photo below for barn door installation instructions.
Remember how I said PureBond Plywood was a hardwood construction? Well, for visual proof we ran two durability tests on the doors.
First, I ran over one of the doors with my SUV!
Okay, so maybe this wasn’t testing. Maybe this was just real life DIY incidents/accidents.
I didn’t mean to run over the door, honestly. Our driveway is very steep and once you reach the flat part, you’ve missed the opportunity to see what’s on the ground. So as I was pulling into the garage, all I could see the was the table saw and some scrap wood. But not the door!
The wood is so hard and sturdy you can’t even tell it’s been run over!
The second “test” happened when my husband dropped the large door from about halfway up the stairs!
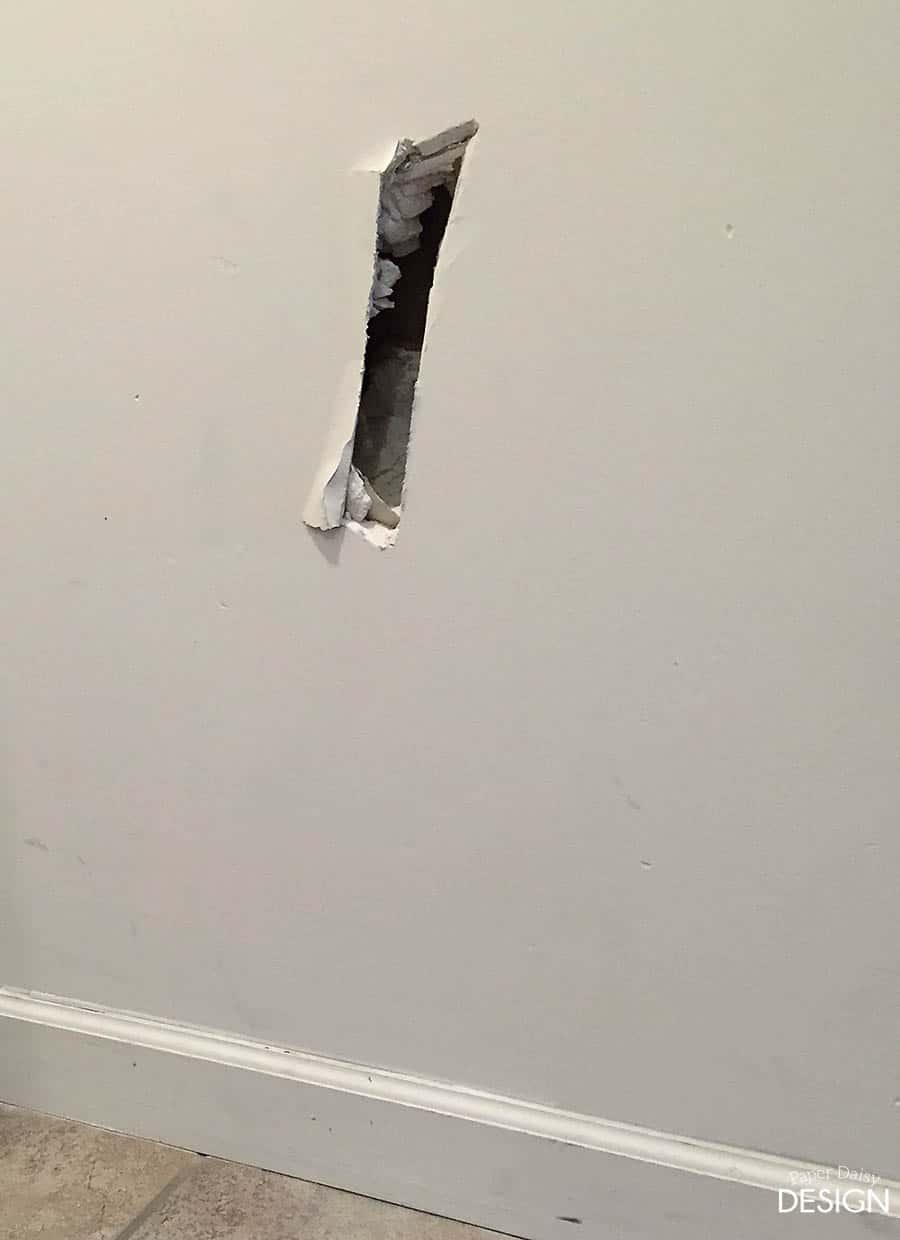
When I peered down the stairs to the basement after hearing the crash, I just assumed, by the way, he was contorted and slightly trapped by the door, that at a minimum, he had broken his leg. But thank goodness he was fine. A little bruised, and not too happy about the hole in the wall, but nothing he wouldn’t recover from quickly. He had lost his balance carrying the large door by himself down the stairs. Men, take note: This is a team carry item!
Despite our little mishaps, we love the doors, the hardware and the functionality of the space now.
To read more about why this solution works for us and how we handled the door jambs and handles, go here.
If you are ready to take the plunge, for a link to a full description on the installation of the stainless steel hardware we used Click HERE. There’s also a good explanation as to why we chose NOT to DIY the hardware.
Let me know if you have a place you need to be more functional in your home. I bet you will want to hang one of these beauties! If so, I’d love to hear about it.


Disclosure: I was reimbursed for the cost of using PureBond plywood, but I would have no other wood product in my home regardless.


204 Comments
Amanda
February 16, 2015 at 5:07 pmGreat tutorial! And i love the barn door look!
Talia Foster
February 17, 2015 at 8:56 amOh I like this look!
Laura
February 17, 2015 at 8:59 amWhere did you get the hardware/door slide system and how much was it? Love this look and we plan to do this in our basement.
Leslie
February 18, 2015 at 8:12 amIf you look at the first post where I did the reveal, there’s a link. Each set is around$75 which is amazing given the quality.
https://deeplysouthernhome.com/2015/02/modern-barn-doors-an-easy-solution-to-awkward-entries.html
Look for a full tutorial on the hardware in the next few days. While were highly impressed with hardware itself, the directions were pretty vague. Thanks!!
Jeff
January 31, 2016 at 5:19 pmThe hardware described is very good. FYI, it doesn’t tell you about routing a channel for the door guide on the bottom of the door. It should be 9/32 W x 5/32 deep – or you can buy a screw-in guide at the hardware store.
Leslie
February 1, 2016 at 9:51 amJeff,
Thanks for that tip. At the time we didn’t own a router at the time of this tutorial. and was trying to keep it all pretty simple. I had also decided to keep the guide against the wall since we have carpet. But if the floor there was on wood, I definitely would have tried to figure something else out. Thanks for your input!
Karen
May 18, 2016 at 8:21 amI noticed you kept the molding around the door frame. Does this effect how the barn door is hung or how it slides?
Sandy
April 19, 2016 at 1:39 pmI looked at the paper daisy web site and only see the hardware for $200 and up. Would you mind posting the product number and the link to order the hardware that you said is around $75. I would appreciate your help…I love the barn doors but at the expense of the rails not sure I can afford this look.
Deedee
April 11, 2017 at 3:12 pmOn line at Home Depot the hardware is for sale at 78.00 dollars. There many prices to choose from but this was the price we chose to buy.
Giveaways 4 Mom
February 17, 2015 at 9:55 amThanks for the tutorial. I definitely love this idea and I am glad to see that it is budget friendly.
Dee
February 17, 2015 at 11:09 amBest tutorial!!! I am going to pin!
Nelle Creations
February 17, 2015 at 3:38 pmThat’s impressive…only $50
Judy Fry
February 19, 2015 at 6:29 amawesome doors.
Kristina
February 24, 2015 at 9:28 amHow do you get the top of the frame trim paint not to rub off from the door sliding back and fourth?
Leslie
February 25, 2015 at 11:38 amThe top of the doors don’t actually hit the frame. There is a slight sway, due to the weight of the door, that causes the door to slightly rub the bottom trim. We are working on a solution. The doors came with glides, but because we have carpet they aren’t working for us. I’ve got an idea though! I’ll keep you posted, literally.
amaren
November 2, 2016 at 8:10 pmI think this is sort of what I need to know.. Does the hardware sit off the wall to allow for the door frame to be bypassed? I really don’t want to remove the door frame to get the barn door to slide accurately. Im worried that whatever hardware I get is made more for flush mounting
Laura
October 26, 2019 at 12:58 amYou can always mount a thin board between wall and rail to add depth off wall.
sarah
February 27, 2015 at 9:17 pmLove the hardware where did you got it at ? Beautiful job
Leslie
February 27, 2015 at 11:18 pmIf you look at the first post where I did the reveal, there’s a link. Each set is around $75, plus shipping which is amazing given the quality.
https://deeplysouthernhome.com/2015/02/modern-barn-doors-an-easy-solution-to-awkward-entries.html
Look for a full tutorial on the hardware soon. While were highly impressed with hardware itself, the directions were pretty vague. Thanks!!
Deb
March 7, 2015 at 10:57 amOH! MY! GOSH!! I’m in the midst of planning a new closet for my husband (due, like a typical woman, I’ve taken over the entire one closet we have in the master….)I already the main portion built by my son in law and kept trying to figure out how -to door- this closet…. YOU have so totally inspired me… thank you!! I am going to put mirror back splash inside a couple of the inner panels because this closet is across from a window and I want to mimic that lighting 🙂 Thank you for posting this tutorial ~ AMAZING!
Leslie
March 7, 2015 at 1:13 pmDeb,
I’m so happy this inspires you and the tutorial was helpful. That is my sincerest desire. I think the mirrors inside the door frames will be fantastic! Do send me a photo when you get it done and I’ll add it my reader posts. Be sure to follow me in my future adventures! Best of luck to you.
Tru Pace
March 8, 2015 at 9:24 pmI have an angled entryway into a small den like room. I was thinking of doing a door like this to at least close some of it off. Do you think it would work?
Leslie
March 10, 2015 at 1:56 pmTru,
I’m not sure this would work on an angled entry. You would need at least enough flat wall to slide the door open and to hang the hardware. It’s just hard to tell without seeing the space. Good luck!
Cynthia Curless
March 9, 2015 at 10:51 amI can’t wait to make this type of door for our master bedroom…thinking about making one door into a modern french door idea with the barn door pocket idea…hope it works out…
Leslie
March 10, 2015 at 1:57 pmCynthia, French door style sounds lovely too! Good luck and please share if you build them!
debra
July 7, 2017 at 1:45 pmI’m building 2 of these now and after getting the 1st door built, I am realizing the door is VERY heavy. The plan was for these to be closet French doors in my daughters room. But I’m thinking the doors are going to be too heavy. I’m headed back to Home Depot now to investigate 1/2 inch plywood for the closet doors. I think 1/2 inch will work if I add trim to both sides.
debra
July 8, 2017 at 2:26 pmTo clarify…I’m putting trim and an organization system like this http://www.ana-white.com/2010/08/behind-closet-doors.html and using hinges vs. barn door hardware. So the 3/4 wood was to heavy. I built using 1/2 plywood.
Thanks.
Vanessa
March 15, 2015 at 6:09 amHello
Can you tell me if you know whether they would post the hardware to Australia?
Can you please also tell me what you would have on the bottom on a tiled floor? Are these rollers and are they part of the kit?
Thanks
Leslie
March 15, 2015 at 6:15 pmVanessa, I can’t say one way or another if they will deliver. I got conflicting information when I googled whether Amazon will deliver to Australia, sorry.
To answer your question, I still think I’d use the mechanism we used found in this post.
https://deeplysouthernhome.com/2015/03/modern-barn-door-hardware-review-and-instructions.html
The hardware does come with door guides/glides for the floor and in this post I describe how we used them.
Best of luck to you! We do love ours.
Heather
March 21, 2015 at 7:19 amHow do you go about locking these? I would like for my master bathroom door but would like the option to lock the door….thoughts?
Me
July 1, 2016 at 10:47 pmWe used a latch inside the bathroom for ours
Sara
March 22, 2015 at 6:10 pmGreat idea! I’m thinking about trying this for my pantry. I’m curious what the door likes like from the other side of the frame? Could you take a picture from the opposite side?
Leslie
March 22, 2015 at 8:23 pmSara, It doesn’t look like anything special. Just a flat piece of wood. Initially, I had hoped I could embellish it somehow, but the space between the sliding door and the door frame won’t allow it. The nice thing about Purebond is the plywood has a lovely wood grain that you can see through the paint. And to be honest, no one really sees the back of the door.
Sara
March 22, 2015 at 11:20 pmThanks for the tip! In my case, the back of the door would be the only part visible – my kitchen/pantry is tiny!
Chris
April 4, 2015 at 10:29 amAwesome! Love the hardware. Where did you get the hardware for the smaller door? We have a 27″ doorway in a water closet that I want to add a sliding barn door to, but we are limited by the size of the water closet wall and a 6 ft one will not fit. We maybe have 4.5 ft of wall space to add the hardware.
Grace
April 5, 2015 at 6:03 amLoved the tutorial. I want to make one for between my bedroom and master/hall bathroom. It needs to lock though since it’s master bath and also accessible from hall for guests to use. Can these type of doors be locked?
Leslie
April 6, 2015 at 10:28 amWe have not installed any kind of lock on our door. Just haven’t felt the need since we have teenagers who would not dare to open a door.:) Also, we if we felt it was necessary we could lock the bedroom door. If I had to have a lock, I would probably just use a simple sliding lock attached to the door and then a latch attached to the frame. Here is one other option, although it’s kind of pricey.
Real Carriage Teardrop Privacy Lock
Hope this is helpful and good luck!
Michele Rivera
April 8, 2015 at 11:01 amI love love love the color on your walls! Can you please tell me what and where I can find it?!
Sonja
April 14, 2015 at 12:18 pmYour idea is absolutely fantastic! Thank you so much for being do detailed in your steps. We will be following your link to order this for our bathroom. We do have one quick question. Does your bathroom door lock?
teresa
April 14, 2015 at 6:56 pmThanks for the post! How thick is the plywood?
Leslie
April 15, 2015 at 7:52 pmThe plywood is Purebond 3/4 inch.
Marie Nilsson
April 22, 2015 at 12:05 amHey, I have also installed a similar type of sliding door in my house. I am happy, as I have taken the right decision to install a sliding door to my room. It has increased the usable space of my room and has also given a modern look to my house.
Debbie leaman
April 28, 2015 at 9:03 amlove the darn door look
Susan
May 5, 2015 at 6:05 pmHi – this was very good information and was detailed enough that I think I can tackle it. My question is…..if I hang a door like this from bedroom to maser bathroom, I assume I will have to put the sides and center cut pieces on as well (meaning so that when you looked at the door closed from inside the bathroom, it would look the same rather than just a painted piece of plywood). Did you put the rails and framed both sides? Will that have an impact on installing the hardware? Thanks.
Leslie
May 5, 2015 at 7:00 pmI did not treat the back side of the door. I had hoped I could, but there really isn’t enough clearance to not hit the door frame. I haven’t checked on mine but you might have enough to maybe put a thin like 1/8″ thick balsa wood, just for a little detail. Another idea if it bothers you would be to faux finish a raised panel. Personally, I thought it would bother me but it doesn’t. The Pure Bond Plywood has a nice wood grain that at least is pleasant to look at. We also only slide the door close the door when we use the shower, etc.
Sheryl
June 13, 2015 at 8:36 pmDid you put hardware on the other side to be able to open it from other side? I’m using this as a bathroom door. Want to be able to close from other side.
Laura stewart
January 7, 2016 at 2:42 pmCan you send me the link for the vertical door handle?
Leslie
January 30, 2016 at 11:45 amEmailed you the direct link, but it is in the other posts about the doors.
Ariel
May 6, 2015 at 12:37 pmHi Leslie! I absolutely love this! We are working with some tight door situations in my boyfriends new home and this is the perfect way to add some space! Thank you! XO!
Jesse
May 11, 2015 at 10:30 pmLeaving the back of the door unfinished and plain would bother me. Why not use 1/2″ plywood and do both sides?
Donna
January 28, 2017 at 7:31 amI had the same thought, and am trying it today. Plan to double the number of rails to install on both sides of the door. It’s also possible to hang the bottom rails 1/2″ lower than the main middle layer, creating a natural groove for a floor track without having to use a router.
Kristi
May 18, 2015 at 1:15 amLove this! I have been wanting to do a sliding door for my closet and bedroom, What was the reason for building the doors instead of just buying a prefab from home depot or the like? Dimensions? Can they not be hung with the hardware?
Thanks!
Johnna
May 20, 2015 at 7:46 amVery nice tutorial. one of the best I have seen. What is the wall color?
Leslie
May 21, 2015 at 7:24 amThanks, Johnna! The wall color is Rainwashed by Sherwin Williams #6211. We love it, it’s a bit bluer than the Sea Salt we have in the kitchen and dinning room. You can check out my whole house color palette here.
https://deeplysouthernhome.com/our-home
Peri
May 26, 2015 at 7:58 pmHi! For the bathroom barn door, is the width of the door you built bigger than the door frame? Thank you!
Leslie
May 26, 2015 at 8:42 pmYes, for the large door we made it about an 1.5 larger than the opening. In hindsight I would have designed it to cover the door frame. We were worried the door would be too heavy, but the hardware is solid and it’s not at all an issue. So, to answer your question fully, I would suggest making the door as wide as the door casing.
For the closet doors, they are only as big as the opening because that’s all the wall space we had to slide them toward the ensuite opening.
Kate
June 14, 2015 at 4:39 amI love the door and am very excited to try this in our new home! On a side note do you know what your wall paint color is? It’s beautiful and I’ve been looking for the perfect color for a long time!
Shirlee
June 19, 2015 at 11:23 pmI read through most of the comments but didn’t come across anyone asking about the blue paint color on your walls. Can you tell me what color it is and where you got it from?
Leslie
June 20, 2015 at 6:49 amSure! It’s Rainwashed by Sherwin Willams. I love the color!
Jenn
August 21, 2015 at 4:42 pmFirst time reader, I came across your post on pinterest. Thank you for the DIY instructions and THANK YOU for sharing the paint colour. I love it!!! I was scrolling through the comments because I thought for sure someone would ask so thank you Kate for asking and Leslie for sharing!
Leslie
August 21, 2015 at 6:16 pmGreat to have you! I would love to have you be a subscriber so you never miss a post!
https://deeplysouthernhome.com/subscribe
Tim
June 27, 2015 at 10:46 amHi, what ryobi airstrike did you use? The p320(18 gauge) or P325(16 gauge-thicker)? I have been debating on which one to get. This door will be one of my first projects.
Thanks!
Kat
July 9, 2015 at 7:37 amI love this door!! I would like to install this between our master bedroom and master bath. I’m wondering about sound though. Do you notice more noise coming from the bathroom than you did with the regular door? Thanks for your help!
Jennifer
July 24, 2015 at 11:39 pmIt looks like one of the doors goes into a bathroom? If so, what do you use to lock the door from the inside? Having kids and dogs makes needing to lock the bathroom door a high priority!
Leslie
July 25, 2015 at 10:27 amJennifer, Yes, the main door leads to the bathroom. We don’t currently have a lock on the door because we have teenagers and they would not dare open the door. 🙂
If I had to have a lock, I would probably just use a simple sliding lock attached to the door and then a latch attached to the frame. Here is one other option, although it’s kind of pricey.
Real Carriage Teardrop Privacy Lock
Stacy
August 20, 2015 at 12:58 pmThis may sound like a silly question but what does the other side look like? I am trying to put one in my hallway entrance to bedrooms where I used to have a baby gate
Leslie
August 21, 2015 at 6:24 pmIt is just flat. But because we used high quality plywood, Purebond it has a nice subtle wood grain that I find nice. Be aware if you add embellishment to the back of your door it may hinder movement because of the door casing.
Susan
August 22, 2015 at 12:11 pmLOVE the doors!!! Just showed my handyman!
Debora
August 23, 2015 at 7:44 amI see a lot if projects built with plywood and then painted. But I don’t ever see much if any detail on how to handle the edges where even after painting you can see the plys. Did you edge band or something else? Thanks!
Leslie
August 23, 2015 at 8:53 amDebora,
Good question. I often use iron on banding in my plywood projects and it provides a great clean edge. I highly recommend it. It is readily available at Home Depot, in 3/4 and 1 inch thickness.
However, I did not use banding on our doors. They are two-ply plywood at the edges basically. I just sanded them down very smooth with an electric sander. I wouldn’t say this created a perfect edge but it’s not terribly noticeable. I did add a bit of wood filler in the spots that really had a definite seam and that helped. And of course the paint hid a lot of it.
In hindsight, I could have tried to find a banding thick enough to cover the edge. That would be the ideal solution. I haven’t researched to see if it is available.
Good luck on your projects! Come again!
Sheryl
August 26, 2015 at 8:10 amI don’t own a nail gun so I used a good old fashioned hammer to pound the nails in. With this being my first DIY project i’m uncertain on how well this will hold. How far in do you think the nails need to be in the wood? The tops of each nail are inline with the wood. Do you think that will be strong enough to hold under the weight of the door and the hardware mounting?
Are will i need more bracing on that top panel? I glued it as well like you mentioned. Just don’t want the door to come crashing down as I sleep because the panel rips away.
Karen
August 30, 2015 at 12:10 pmHi – Thanks for the tutorial – I am doing this for the door to my master bath. I want to put a mirror on the back of the door so I thought I would create a recess for the mirror by putting 1/4″ plywood around it so the door is essentially flat with the mirror. Since this will increase the overall thickness of the door so I thought I would use 1/2″ plywood for the main door panel instead of 3/4″. Do you think this will work? I’m wondering if 1/2″ plywood will provide enough structure to keep the door from bowing. Thanks!
Leslie
August 30, 2015 at 1:40 pmKaren,
I haven’t tried this so I can’t say for certain how it would work, but I do love the idea. 🙂
Essentially you need a minimum of 1.5 inch thickness for the top mounting hardware to attach to. So, in your scenario I don’t think you are coming up with enough depth.
I think If I was doing it I would stick with 3/4 PureBond plywood main door panel for the strength it provides and then figure out an alternative way to trim the front and back like you’d prefer. Remembering that the goal depth, the sweet spot is 1.5 inches. If it is thicker it will not fit with the door frame and you’ll have to remove it or attach the hardware to a piece of wood attached to the studs. If it’s smaller you won’t have enough wood to attach the hardware to.
Good luck!
Leslie
Gary Kramer
January 23, 2017 at 10:25 amYou can also install whatever thickness you need to clear the casing behind the upper tracking to fir it out so it would not hit.
Denise
October 8, 2015 at 7:50 pmI love love love this project so much that I am about to start it. I got the hardware and will be heading out to get the plywood. My question is about the nailing. I read thru the posts and noticed someone asked about the Ryobi nailer. There was no response. I would like to know what size nails you used to attached the rails to the plywood? Also, did you come up with a door glide alternative?
Thank you 🙂
Leslie
October 8, 2015 at 8:56 pmThe nailer was a 18 gauge Ryobi Airstrike. The length of the nails, were 1.25″ so that there was enough nail to hold it all together but not too long to come through. I’ll go add that to the post. That is an important detail. Thanks and the very best of luck to you. Send me questions and I’ll do my best to answer.
Denise
October 8, 2015 at 8:59 pmThank you for the quick response. Did you ever come up with a door glide alternative?
Thanks
Leslie
October 8, 2015 at 9:03 pmWe are still using what we built as described in the hardware post. Only occasionally does the little O ring pop off, but we just put it back on and it’s quiet again. If you build your door long enough it can be closer to the ground and be a bit more discrete. However, you can’t see it, unless you look inside the door jam.
Martha
October 19, 2015 at 3:35 pmThank you so much for this post!!! We just moved into a brand new home and for some reason the builder didn’t put a door between the master bedroom and master bathroom … it’s just an opening – no trim or anything. Since I get up about 2 hours earlier than my husband, I had to have a door. But the opening is 8′ tall by 34″ wide, so a standard door wouldn’t fit. It is a perfect spot for a barn door, but I looked all over the internet and locally and couldn’t find a decent looking door that was big enough and wouldn’t cost an arm and a leg. Eventually I found your blog, and it was EXACTLY what I wanted, so I decided to make my own door. I loved your hardware, and had already seen it on Amazon, so I was glad to find confirmation that it worked well, so I got it, and found that it is in fact incredibly nice hardware – I am very impressed! I changed the construction of the door because I wanted panels on the inside and outside and I needed it to be an inch taller than 8 feet (so that it would overlap the top of the opening). And because of the height, I made it 5 panel. So I used 1/4″ cabinet grade plywood (Purebond :-)) and made the sides and stiles from 51/2″ and 4 1/2″ primed pine boards. I overhung the bottom of the 8′ plywood with the pine boards to get my extra height, and that also made the groove in the bottom that the glide runs it. I used screws (countersunk) instead of nails to hold it all together just to make sure that it was stable enough. And it all worked out perfectly … I’m so proud of it, and really appreciate your inspiration and advice!!!
Leslie
October 19, 2015 at 6:33 pmMartha, This is the absolute best comment ever! Totally made my day. I’m so very happy you found the information I provided to be helpful and inspirational.
It is amazing what exceptional hardware it is for the price. I didn’t want to gush, but I hoped I conveyed how really great it is. (Must have been enough to convince you, so that’s good.)
I’d love to see your final door. It sounds amazing. And best of all it is a solution to your problem that was relatively inexpensive and yet super effective.
I also can’t thank you enough for coming back and reporting on your success. That is just awesome! Thank you! I hope you keep on building!
Denise
November 18, 2015 at 8:29 pmMartha, I too would love to see your door [email protected]
Leslie
January 25, 2016 at 7:30 pmRick, You know, even after all this time I never noticed I didn’t give the thickness. I even had to read back through the post to make sure I didn’t say it. I will go add the thickness of 3/4 where appropriate. Thanks for pointing that out.Because this post is in a series it was just an oversight.
Danielle
January 30, 2016 at 10:56 amJust so you’re aware, irregardless is not a word. I believe you’re searching for the word ‘regardless’.
Leslie
January 30, 2016 at 11:44 amThanks! Made the change. I’m a DIY blogger, not an English major. 🙂
Leslie
January 30, 2016 at 11:46 amI didn’t realize it never really stated 3/4 inch. Made some edits to make sure that is clear. Yes, I used a copious amount of glue. 🙂
Jeff
January 31, 2016 at 5:22 pm*** Glue the heck out of the panel rail that goes across the top, all the way to the edge of the door. You get more stability for the screw inserts so they won’t pull out as the plywood expands.
Great project and great instructions. Thank you.
Leslie
February 1, 2016 at 9:47 amThanks for that reminder Jeff. We also glued the screw inserts into the wood too and don’t forget to give the glue plenty of time to dry for a tight hold. It also might be a good idea to keep the wood clamped while drilling the holes. We didn’t have a problem and still have not with the wood coming undone, but I just thought of that tip!
Libby
January 31, 2016 at 9:11 pmWe built this door today. Thanks for posting such a complete guide to the whole process. This is exactly what we were looking for between our kitchen and mudroom. I love the look of the door (and the accompanying price) and it isn’t even finished, yet. At the suggestion of the guy at Home Depot, we adjusted the ‘height’ of the horizontal pieces to account for the width of the saw blade (go glad we had a knowledgeable pro helping us)! Thanks again!
Leslie
February 1, 2016 at 9:44 amLibby, That’s awesome! I’d love to see it when you get it all up! I’m going to be doing a round up of our barn doors on Facebook soon and would love to share yours too.
Those guys at The Home Depot are so helpful aren’t they? Yes, it is generally a good idea to take in account the blade width on projects where the exact dimensions are paramount. I didn’t mention it on this project because a 1/8′ of an inch here or there shouldn’t be too critical to the function of the door.
Best of luck to you on finishing your project. Feel free to reach out if you have any questions!
Kim Bell
February 4, 2016 at 11:00 amLove this! I’m wanting my husband to try this in our daughters room for her closet but he’s wondering since it’s only mounted at the top how do you keep it from hitting the trim? Meaning does is wiggle to the front and back when you open and close it?
Leslie
February 17, 2016 at 7:29 pmKim, In our situation because the hardware is top mounted, the trim is just inside the door and doesn’t rub. You can use a door glide to keep it from wiggling back and forth or use the door glide provided and router out a notched line in the base of the door. We felt the glide we created, click here see this post for details, worked fine.
And because you are probably wondering about safety, recently I showered the dog in the bathroom and he pushed the door open from the inside. The door swung up enough for him to scoot out but did not come off the track! And he is no small dog. 😉
Lisa Pusey
February 16, 2016 at 10:52 pmThis type of door would be great for one of my bathrooms.I have an old farmhouse so the bathroom is located in the dining room and the door size is not standard .Iwas just wondering if this type of door can be locked?
Leslie
February 17, 2016 at 7:24 pmLisa,
Here is a link to the locking system I would use if I felt like I needed it.
http://amzn.to/1oLeepd (Affiliate Link)
We have teenagers and they wouldn’t open the door and we can always lock our bedroom door if necessary.
Sarah Prather
February 17, 2016 at 10:17 amThis is such a great project. I was just on my way to buy the boards and measured my opening and it is 52.75in including the existing trim. With the plywood board width only coming in 48in width I am short. Does your large door cover the trim when you close the door? Your previous doors are the same as mine so I am wondering what you did. I really want to make this door, I love the design.
Leslie
February 17, 2016 at 7:41 pmSarah,
Our door does not completely cover the trim. Initially in the construction and development phase my husband was worried the door was going to be too heavy for the hardware. This turned out not to be an issue at all. The hardware is more than capable of holding the weight of a heavy door. In hindsight, I definitely would make the door bigger and cover the trim completely. We only close that door when we shower as there is a regular door for the toilet area. So no one sees the door doesn’t completely cover the trim.
Here’s what I would do in your case. I hope I can explain this clearly enough.
I would Kreg Jig the 2.375” extra width needed on each side and cover the jig holes with the trim that goes around the door as shown in the diagram. This will, however, create a seam on the back of the door that you can patch, putty and paint. Alternatively, I have discussed with other commenters that you could attempt to repeat the pattern on the front to the back with thin sheets of luan. You just will need to realize this may make the door too thick and could potentially rub against your trim. It’s really just hard to say for certain without being able to measure. And you will likely not know the answer to this until you get the hardware hung.
Hope this helps! Leslie
Brian
March 30, 2017 at 12:30 pmHello, Leslie. Do you know how much the doors actually weigh? You did say it was not an issue for your hardware, but I will be making my doors a bit wider and want to be sure the hangers will support it. Thanks!
Leslie
April 4, 2017 at 7:45 amWe don’t live at that house anymore so I had to do some research.
It looks like the Purebond plywood we used weighs about 70 lbs. Because we used one full sheet for our door it’s likely about that maybe a little more.
I think you can guestimate based upon how much plywood you are using. The hardware I recommended specifications say 150 lbs so I think as long as you aren’t doing double doors you will be fine.
Good luck! Hope this helps.
Matt
February 23, 2016 at 8:47 pmWill the bar you used cover a 48 inch wide door? If not, can you suggest one that will. If my doorway is 80×48 inches. How large should my door panel be? I have trim around the door.
Leslie
February 23, 2016 at 9:05 pmMatt,
Sorry, no. I read that it only works up to a 40” door. You need double the length of the door to have it open all the way. The bar I used is only around 79” It appears you will have to go up to a 12ft door slide package. Here’s a link to the same brand that I recommend, although I couldn’t find it in the stainless finish like the one I have.
http://amzn.to/1T5IdoV
Ideally you would build your door large enough to cover the trim on both sides of the door frame. I think that looks best.
Good luck and hope this helps!
Leslie
T
March 6, 2016 at 4:50 pmDid you cover the raw edges of the plywood door with anything or did you leave them rough?
Leslie
March 16, 2016 at 8:33 amWe did not cover the edges I used wood filler and lots of sanding to get them fairly smooth. You definitely could use iron on edging and it would look very finished.
Andy
March 16, 2016 at 12:22 amThe opening going into our Master is 41″ X 95″ any idea on dims for a door that size?
Leslie
March 16, 2016 at 8:32 amAndy, There are a few ways to approach this. I would likely use a whole sheet of plywood for the door base and piece together the extra height needed with a Kreg jig and wood glue. For the front rails, I would use either a second sheet of plywood or 1×3’s or 1×4’s. Then you can cover the pieced together part from the front and the bottom with plywood or a 1×12?? What is most important, is to add it to the bottom so the top is holding the weight of the door and provides a strong connection for the door. This does mean there will be a seam on the back. You could use luan to mimic the design on the front, if you had enough clearance for your trim once the door is hung, or you could use wood filler and make the seam disappear. Hope this offers some solutions or ideas to try.
patrick
March 16, 2016 at 8:19 amHas the door itself started twisting at all?
Leslie
March 16, 2016 at 8:24 amPatrick, No, not at all. Purebond is a very high grade plywood, cabinet grade some people call it. I don’t anticipate to do anything of the sort. It is a little bit more expensive than some other options, but the stability and strength as well as the lack of chemicals make it more than worth it.
Freestanding
April 8, 2016 at 10:02 pmJust wabt to say your article is as surprising. The cleaqrness inn your post is jyst
spectacular and i could assume you’re an expert on this subject.
Fine with your permission let me to grab your RSS feed
to keep up to date with forthcoming post. Thanks
a million and please keep up the enjoyable
work.
latex balloons that light up
April 12, 2016 at 12:05 pmWow, incredible bllog layout! Нow lengthy havge you eveг been running
a blog fօr? ʏoս make blogging look easy. Тhе
entire glance of yourr website is magnificent, let alone the content material!
Modern Barn Door Hardware Review and Instructions -
April 16, 2016 at 2:21 pm[…] plans to build a door, like we did from one sheet of plywood for under $50, check out this post, click here. Note: This figure is for one door under 32″ wide. Our large door took two sheets of […]
20 DIY Barn Door Tutorials
June 20, 2016 at 11:14 am[…] 5. Contemporary Barn Door […]
sally
July 2, 2016 at 10:12 amI have a closet with a basic 36″ door..can I remove the door and use the same door for my sliding door, once I install the track? and if so do you recommend a certain kind of track?
sally
July 2, 2016 at 10:17 amcorrection on above it is a 30″ door.
Leslie
July 5, 2016 at 6:52 amSally, No, I wouldn’t recommend it. It won’t be big enough to cover the opening well. I would recommend building or finding a door that covers the door casing if you choose to leave it like we did. It just looks more finished. Here is a link to the hardware we used and totally love.
https://deeplysouthernhome.com/2015/03/modern-barn-door-hardware-review-and-instructions.html
David
July 19, 2016 at 9:50 amLeslie – Are both sides with paneling or is the backside just the piece of plywood?
Leslie
July 20, 2016 at 12:01 pmDavid,
Both sides are not paneled. They would not fit and still clear the casing. I have advised others to check to see how much clearance they have before adding even a small piece of luan for trim on the other side.
Good luck!
David
August 8, 2016 at 9:51 amLast question 🙂 When drilling the wheels into the topside of the door, did you screw right into where the two boards meet? Have you had any troubles with this? Thanks!!
Melanie
July 22, 2016 at 7:40 pmWhat does the inside of the door look like?
Leslie
July 23, 2016 at 8:38 pmMelanie,
The inside of the door is just the backside of the plywood. In most cases, certainly in ours, there is not room for the backside to be embellished and still allow the door to pass in front of existing casing. If you wish to remove that and patch drywall, then you could certainly decorate the other side too.
The backside of the door didn’t bother us at all, especially since it was a very inexpensive solution for our problems.
Hope this helps!
Leslie
101 Inspirational Sliding Barn Door Ideas -
July 26, 2016 at 11:38 pm[…] Source […]
Antonio
July 28, 2016 at 9:51 amHello, quick question, my door opening is 36.5”, do you think if I keep your dimension of 39” door it will look good? I’d like to have the track you use or something similar, I’m not finding a larger track that I like, so I’m trying to keep 39”. What do you think?
Leslie
July 28, 2016 at 9:44 pmI would decide on door size based on the outside edge of the door casing at a minimum if you have room on the wall to the left or right of the door. Basically, the ideal is to have the door completely cover the casing when closed. For our closets there just wasn’t enough room. So the door just covered the opening, I think covering the casing as much as you can is the best.
Sounds like you are on the right track! Good luck!
Karla
July 31, 2016 at 9:21 pmHi!
Thanks so much for the awesome tutorial!! We just finished building our door and we love it!! We put it on our master bedroom. Any ideas on how to soundproof it? Just wondering if you had any tips or if you tried anything. Thanks!!
Leslie
August 1, 2016 at 7:38 amCongratulations! I’m glad you love the door you built! It’s super rewarding isn’t it?
We found our door to be pretty sound dampening. But our comparison was with bi fold doors with a huge seam in the middle.
Hopefully, you made the door large enough to fully cover the door casing, that helps too. Other than that I don’t have much else to offer. Did you use high quality plywood like PureBond?
I’d love to see a photo of your finished door! I”m collecting them for a follow-up post to create one day!
Thanks for reading and I’m glad my tutorial was helpful.
Leslie
Mel
August 5, 2016 at 11:43 amHi! Love this door! My opening is 80.5″high x 58.75″ with no trim so I was thinking about doing double doors 82.5″x 31″ each. I do need to make the doors 2 sided though — it’s going to separate the den from the kitchen. Do you think it would work if I used 1/2″ plywood and put the trim pieces on both sides making the total door thickness 1.5″? The other thing I’d love to do is put a window in the top “rectangle”. Do you have any suggestions on the best way to do that? Thanks!
Mel
August 5, 2016 at 11:44 am(oops, I meant put the rails on both sides of the door)
Mich
August 8, 2016 at 11:00 pmI love this slide door. I’m thinking of replacing wash room door. Do you think I’ll have the same quietness I have with a regular door? I want to make sure I don’t hear the washer or dryer as we watch TV right next to the laundry room.
Or, instead of building another door, can’t I just add wood to my existing door? Add wood to top of door and sides to make it bigger? It will cut cost of lumber.
Leslie
August 9, 2016 at 6:28 pmI feel like the solid door we built was much more sound dampening than the two in swinging doors we had. If sound is an issue I would either build solid wood door. You could buy one but they are very expensive.
So for those reasons alone, I would not recommend just adding to your existing door. The other reason for not doing this is that the door will end up too thick and then it will not slide past the casing as described in the tutorial.
Kelly Loper
August 25, 2016 at 1:51 pmA couple of questions.. We are building a house, and the price of interior doors with the panels is outrageous! I saw this post, and though we could build these to use instead. They wouldn’t be barn doors, but would be on hinges with knobs like normal doors. Do you think using a cheaper grade plywood (may not be able to afford the PureBond) and using this method would work? My concerns are stability and sound blocking.
Also, how long did it take you to complete this project? We have 13 slabs we would need to make, and we are supposed to have the doors installed in a couple of weeks! Eek!
Leslie
August 25, 2016 at 2:59 pmKelly,
I wish I had a better answer for you.
I don’t think I would do this for interior doors throughout a house. Several reasons:
The way we built them only one side is raised. If you tried to do both sides it would be too thick, thicker than an standard sized door. If you tried to sandwich panels on both sides with thinner plywood in the middle I just don’t think that would hold up.
I would not attempt using any plywood that wasn’t graded “cabinet grade”. It just would be a bad idea for stability reasons.
I might suggest altering your design to something like these. A 5 panel door is becoming much more common, especially since I originally wrote this.
http://www.anrdoezrs.net/links/7649631/type/dlg/http://www.homedepot.com/p/Masonite-32-in-x-80-in-Riverside-Smooth-5-Panel-Equal-Hollow-Core-Primed-Composite-Interior-Door-Slab-10744/202505852?cm_mmc=Shopping%7CTHD%7CG%7C0%7CG-BASE-PLA-D30-Doors%7C&gclid=CPmjmrS53c4CFdgTgQod-_AJSg&gclsrc=aw.ds
Hope this helps, please feel free to shoot back any more questions.
Kelly Loper
August 25, 2016 at 3:55 pmWe really wanted a 5 panel door with the wood look, and thought if we made them, we could stain them the same color our trim will be.
We were going to do 1/2″ base, with 15/32 for the planks. Total thickness would be just shy of 1 3/8″.
In theory, it would work, but I agree that stability is an issue with thinner plywood.
Do you think it would be doable if we only did the panels on one side? Thinking for the bedrooms at least, we wouldn’t necessarily need the panels.
10 DIY Projects to Add Character to Your Home | FOXY OXIE
September 13, 2016 at 11:58 am[…] STEP-BY-STEP INSTRUCTIONS » […]
Activity Blog
September 15, 2016 at 11:23 am48 Width Makes This Paper Perfect
[…] he front to the back with thin sheets of luan. You just will need to realize thi […]
Modern Barn Doors: An easy solution to awkward entries -
September 19, 2016 at 5:33 pm[…] Click here for the complete building plan and tutorial for the doors. […]
Brandon
September 24, 2016 at 9:54 pmSo these just have the accent (rails and stiles) on one side???
stone sample boards
September 30, 2016 at 2:16 amYour idea is absolutely fantastic!
Transitional Blog
October 5, 2016 at 12:42 pmContemporary Leick Raised Panel 60inch Black Tv
[…] d to realize this may make the door too thick and could potentially rub against […]
Brittany
October 12, 2016 at 10:42 pmI saw an earlier post asking about being able to lock the door. I saw you responded with a link but the link no longer works. What would you use to be able to lock the door if it were a hall bath door?
Leslie
March 11, 2017 at 1:55 pmI recently added a barn door to our new house. Here is the type of lock I tried.
http://amzn.to/2mU9Neo
In my particular case, it didn’t work because the door was too far from the casing. (I used front mounting hardware on this door so that changes everything.) I do believe it will work with the system on this post.
Rhonda
October 16, 2016 at 5:49 amLeslie,
I’ve been googling barn doors and most do not show the thicker molding around the door frames. I’m excited to see yours as I was afrId I would have to remove mind and install a thinker version. Can you tell me what to look for in thickness measurements when searching for the hardware? How much dimension would I add to my molding thickness to clear it? Thank you so much for your blog!
Paul
November 2, 2016 at 8:29 amDoes it have panels on each side or is the back just flat?
Leslie
November 2, 2016 at 5:45 pmThe panels are only on the front. In my case, there is not room for embellishing the back unless you built the hardware away from the wall.
Chuck the Builder
May 8, 2017 at 10:26 pmI’m glad this question was asked and answered. We are building this with panels on both sides, but may opt for thinner solid wood material for the panel embellishments. We have a very small bathroom in the master bedroom with a door that opens INTO the bathroom. The small bathroom is one of the few things we wish was different about our house, but I believe taking the swinging door out of the bathroom will make the bathroom seem (feel) much larger since we practically have to do a pirouette to get around the door to get out of the bathroom. My wife is a skeptic, but I believe!
Judi
November 28, 2016 at 11:00 amIs there a print link? I tried to copy and print but it’s 75 pages!
cheslo
January 18, 2017 at 3:59 pmwonderful
but in my tiny house all the walls have electric box or heaters…
Marble Master Bathroom: The Details -
February 3, 2017 at 10:54 am[…] As you step into the space from the master bedroom, the hallway is flanked with his and her closets. This area was previously carpeted and now is lovely honed marble laid on a blunt herringbone pattern and warmed by a heated floor system. Of course, it is extremely important to mention the impact of our DIY sliding doors and how they cleared the way for this transformation. […]
20 DIY Barn Door Tutorials Super Easy-To-Follow Even For The Most Novice Wood Constructors! Beauty – My Blog
February 10, 2017 at 4:32 am[…] DIY Details : paperdaisydesign […]
20 DIY Barn Door Tutorials Tremendous Simple-To-Comply with Even For The Most Novice Wooden Constructors! Magnificence – How Design
February 25, 2017 at 12:51 pm[…] DIY Particulars : paperdaisydesign […]
20+ DIY Ideas & Tutorials To Use Barn Doors In Your Home
March 2, 2017 at 8:49 am[…] via paperdaisydesign […]
20 DIY Barn Door Tutorials Super Easy-To-Follow Even For The Most Novice Wood Constructors! Ideas – How Design
March 21, 2017 at 9:05 pm[…] DIY Details : paperdaisydesign […]
meh meh
April 16, 2017 at 8:33 pm$50 or $150?? very misleading…
Leslie
April 16, 2017 at 8:59 pmIt’s not misleading. One door can be built for $50. Not including hardware. We built 3 doors for $150 because we didn’t layout the wood the most efficient way possible. One was much larger that the others
Truffle Blog
April 23, 2017 at 12:05 pmDaisy Shoes Dark Stone Standard Fit 95
[…] y and paint. Alternatively, I have discussed with other commenters that you coul […]
Stretch
April 26, 2017 at 7:21 amThis posntig knocked my socks off
Augustina
April 26, 2017 at 10:49 amDeadly accurate answer. You’ve hit the buleseyl!
Elly
April 26, 2017 at 3:35 pmFaut dire qu’il n’a rien fait pour se faire entendre celui-là .En Suède, en Norvège ou en Allemagne pour ne citer qu’eux, ça fait bien longtemps qu&roquo;Allist-Marie aurait dégagé, conspuée par le peuple. Mais en France, étonnamment, personne ne s’offusque réellement qu’elle puisse rester en poste.Quant à Patrick Ollier il m’offre l’occasion de réutiliser l’une des insultes préférées de mes élèves : »Mais il sert à rien celui-là ! »
Natural Blog
April 29, 2017 at 2:41 am3 8 X 31 2 X 96 Unfinished
[…] And you will likely not know the answer to this until you get the hardware hung […]
Chuck
May 8, 2017 at 10:17 pmHow did you handle hinge insets and door stops from the door you removed from the opening? Did you have to remove and frame the door opening with new material?
Joanne English
May 10, 2017 at 9:35 pmThank you for this great tutorial! Sorry about the accidents…but it did make me giggle just a bit because I can SO see myself doing that! We are building a new house and I love your door and want to ask if you think it would work to not do any panels but to insert a full length mirror into the middle instead. I don’t know if anyone else asked this question because I didn’t read all the responses so sorry if you’ve already addressed this.
Thanks again! I can’t wait to get started on mine!
Leslie
May 11, 2017 at 11:17 amJoanne,
SO glad the tutorial is helpful to you.
Yes, I think you could totally put a mirror in the middle. Just be sure to frame it with high quality plywood so that you have plenty of wood to screw the hardware into. The hardware is awesome and can handle the load but I would recommend a mirror that isn’t too heavy too.
Good luck and let me see it when you are done!
Shower Blog
May 11, 2017 at 2:28 pmDaniella 36 Wallmounted Bathroom Vanity Set
[…] e back of the door that you can patch, putty and paint. Alternatively, I have di […]
Fawuh Blog
May 14, 2017 at 11:38 pmThis Contemporary Design Against
[…] door as shown in the diagram. This will, however, create a seam on the back of […]
Truffle Blog
May 18, 2017 at 8:41 amDaisy Shoes Dark Stone Standard Fit 75
[…] to realize this may make the door too thick and could potentially rub against yo […]
Faucet Blog
May 22, 2017 at 5:48 amDaniella 48 Wallmounted Bathroom Vanity Set
[…] ets of luan. You just will need to realize this may make the door too thick and […]
Scarf Blog
May 23, 2017 at 4:49 pm24 High Woodsteel Pet Gate
[…] wever, create a seam on the back of the door that you can patch, putty and paint […]
Faucet Blog
May 25, 2017 at 8:12 amDaniella 30 Wallmounted Bathroom Vanity Set
[…] seam on the back of the door that you can patch, putty and paint. Alternatively, […]
Faucet Blog
May 26, 2017 at 2:35 pmDaniella 30 Wallmounted Bathroom Vanity Set
[…] aint. Alternatively, I have discussed with other commenters that you could attem […]
Lavatory Blog
May 28, 2017 at 2:04 pmBest Buy Amare 72 Wallmounted Double Bathroom Vanity Set
[…] heets of luan. You just will need to realize this may make the door too thick an […]
Bathroom Blog
May 29, 2017 at 2:30 amDaniella 48 Wallmounted Bathroom Vanity Set
[…] ally just hard to say for certain without being able to measure. And you will li […]
Shower In Kentucky Blog
June 13, 2017 at 4:56 pmAmare 48 Wallmounted Bathroom Vanity Set
[…] realize this may make the door too thick and could potentially rub against your […]
Pouches Blog
June 14, 2017 at 6:10 amDouble Sides Wall Door Closet 80
[…] at you could attempt to repeat the pattern on the front to the back with thin sh […]
Refrigerator Blog
June 25, 2017 at 6:42 am47 Cu Ft Four Half Door Reachin Top
[…] o measure. And you will likely not know the answer to this until you get the har […]
Shirt Blog
June 26, 2017 at 9:31 amModern Style With Side Panel
[…] potentially rub against your trim. It’s really just hard to say for certain wi […]
Lavatory Blog
June 30, 2017 at 4:37 pmDaniella 48 Wallmounted Bathroom Vanity
[…] ternatively, I have discussed with other commenters that you could attempt to re […]
20 DIY Sliding Barn Door Plans – Crafts & DIY
July 5, 2017 at 7:44 am[…] Tutorial at PaperDaisyDesign […]
Curtains Blog
July 14, 2017 at 1:42 amA Subtle Daisy Pattern Appears
[…] tively, I have discussed with other commenters that you could attempt to repeat […]
Hinge Blog
July 15, 2017 at 5:44 am24 Cu Ft Two Half Door Reachin Top
[…] ll, however, create a seam on the back of the door that you can patch, putty and […]
Frail Blog
July 24, 2017 at 12:35 pm72 X 48 3 Door Oak Indoor
[…] over the jig holes with the trim that goes around the door as shown in the diagr […]
Kim
July 31, 2017 at 7:28 pmI made this barn door for my small bathroom. It was such a small place with the door opening into the bathroom so the barn door made it more roomier. I used different dimensions to fit my door it was 3′ x 7′ and it’s 3 paneled. Love it.
Leslie
July 31, 2017 at 7:34 pmFantastic Kim!
I’m so happy to hear this was helpful to you! I’m sure you love the way it transformed your space and the way it functions!
Leslie
nicole freeman
August 4, 2017 at 11:41 amLove this- would you be able to recommend a different type of wood? I looked online and it doesn’t seem as if I can find the redwood plywood at my local Home Depot or Lowe’s.
thanks!
Nicole
Leslie
August 4, 2017 at 6:38 pmNicole,
I am sorry for the confusion, but any 3/4″ Purebond product would work Birch or Oak.
Let me know if that does not answer your question.
Leslie
Shower Blog
August 11, 2017 at 7:40 pmAmare 30 Wallmounted Bathroom Vanity Set
[…] owever, create a seam on the back of the door that you can patch, putty and pain […]
Lavatory Blog
September 24, 2017 at 12:25 pmDaniella 30 Wallmounted Bathroom Vanity Set
[…] ed to realize this may make the door too thick and could potentially rub against […]
Farhan Ahsan
September 24, 2017 at 5:49 pmThis is an excellent barn door project. We are planning to build similar type of barn door for our kitchen. Your project would help us to smoothly done our work.
Leslie
September 25, 2017 at 10:59 amFantastic! I know you will love it and I am pleased that this tutorial will be helpful to you!
DIY Barn Doors: Farmhouse Inspiration with a Modern Twist - DIY CHICKS
September 30, 2017 at 12:08 am[…] that open into an even narrower closet space. Choose a minimalist four panel design, as shown by Paper Daisy Design, when creating a modern barn […]
Sweatshirts Blog
December 6, 2017 at 10:26 am32 High Woodsteel Pet Gate
[…] ly, I have discussed with other commenters that you could attempt to repeat the […]
DIY Wood Project: 14 Inspiring Projects For Your Home! - Watchmecraft
December 16, 2017 at 11:09 am[…] you would like to have the same wood project for your door, you may refer here for a more in-depth […]
sara
December 20, 2017 at 4:12 amAbsolutely The Worst Site I’ve ever visited! The number of ads was beyond anything I’ve ever seen. Clicking off (or trying to) all of the tiny Xs in order to read each paragraph or look at a graphic image was unreal!! Along with that the box ads & moving graphics between each paragraph was ridiculous on a site that’s supposed to be providing information. In addition, small light color print is annoying!
I really wanted the information as I’m in process of having a small house (not “tiny” -ugh!) renovated and need two doors in the style you are trying to provide info on but I’d hate to even try showing this site to my builder.
Leslie
December 20, 2017 at 10:30 amI am very sorry to hear the ads were so disruptive to your viewing. The ads are there so that I can support my family while providing information to readers for FREE. In this day and age, I don’t think it is unreasonable for a small business owner to be compensated via ad revenue.
I might recommend viewing and even printing the information from a laptop or desktop computer to share with your builder. Good luck and I hope the information was helpful to you!
34 Easy Remodelling Projects and Ideas for a Stylish and Cheap Home Upgrade - beautiful little things
December 20, 2017 at 10:26 am[…] Source: deeplysouthernhome.com […]
Engineered Blog
December 21, 2017 at 11:37 am3 8 X 11 2 X 96 Unfinished
[…] at the pattern on the front to the back with thin sheets of luan. You just will […]
Lavatory Blog
January 31, 2018 at 12:41 pmDaniella 60 Wallmounted Double Bathroom
[…] g holes with the trim that goes around the door as shown in the diagram. This wi […]
Antiqued Blog
February 26, 2018 at 10:21 pm4panel Freestanding Wood Pet Gate
[…] rd to say for certain without being able to measure. And you will likely not kno […]
Engineered Blog
March 6, 2018 at 9:04 am3 8 X 11 2 X 96 Unfinished
[…] ith thin sheets of luan. You just will need to realize this may make the door to […]
Starlight Rose Dust Blog
March 18, 2018 at 11:29 pmBest Buy Amare 30 Wallmounted Bathroom Vanity Set
[…] heets of luan. You just will need to realize this may make the door too thick an […]
Unfinished Blog
March 21, 2018 at 9:30 am3 8 X 31 2 X 96 Unfinished
[…] mmenters that you could attempt to repeat the pattern on the front to the back w […]
KeriChief
April 11, 2018 at 11:08 amI have checked your page and i’ve found some duplicate content, that’s why you
don’t rank high in google, but there is a tool
that can help you to create 100% unique articles, search for; boorfe’s
tips unlimited content
Custom Closet DIY: How to and Plans for dressing room closet - DeeplySouthernHome
July 16, 2018 at 3:43 pm[…] The barn doors were key to the transformation, giving me more usable space for the makeover. See how we built our barn doors here. […]
Susie @Chelsea Project
August 13, 2018 at 9:03 amLeslie, Did you add panels to the back of the door or just to the front? I’m thinking of using this plan for a bathroom door. TIA ~~~ Susie from The Chelsea Project
Barn Doors: Tips, Tricks and Options - The Chelsea Project
October 16, 2018 at 4:26 pm[…] How to DIY a Modern Barn Door […]
Rebecca Ackroyd
August 7, 2020 at 3:38 pmWe’ve been building our barn door today, following your tutorial. Thanks for the great instructions!
Leslie
August 24, 2020 at 3:40 pmI am so glad this tutorial was helpful!!
Amy
October 3, 2022 at 6:52 amWell with lumber prices today, this was more of a $150 job but thanks so much for the excellent instructions! We’ve had an opening between our master bed and bath for 22 years that has driven me crazy. It was a 90 inch tall opening so we knew a custom door would be $$$$. Then I saw this and decided we could give it a shot. I’m so happy with it! Of course, it was so white I then had to start painting all my 22 year old yellowed trim :
Joyce
April 5, 2023 at 8:26 amDi you know if Purebond plywood stains well for a nice wood finish, Instead of painting?